 Tweet
Tweet
After putting in a real LM308N chip in my newly acquired RAT 2 it sounded great but I still had one big complaint: to get the sound I wanted I had to keep the Filter control fully clockwise. If I backed it off just a little bit the sound was too harsh for my ears. My first thought was to replace the 100pF cap from pins 2 and 6 of the chip with a 150pF cap. However I thought I better browse around a bit and I ran across the Ruetz mod:
DIY Tube Guitar Amp Page
Ruetz was asked by his uncle to mod his RAT for a smoother tone and better low-end so his original "solderless" mod was to clip out the 47R resistor in series with the 2.2uF e-cap going to ground which is connected to pin 2 which would eliminate one of the two RC networks at the inverting input which shape the sound (the other RC network is a 560R resistor in series with a 4.7uF e-cap.)

I tried removing the 47R resistor from the circuit and the results were disastrous: it made the RAT sound like a typical overdrive pedal- and not that good of one at that! However his Ver 2.0 mod which was to replace the 47R resistor with a 500R to 1k trim pot worked really great and I took the optional step of replacing the 560R resistor with a 1k trim pot. The first photo is from the Ruetz site and shows the 47R resistor circled for the PCB used in my pedal. (On that board the 560R resistor is directly above the 47R resistor.) The second photo shows how I fitted in the huge trimpots on my own pedal and should be sufficient proof that you really need to use a smaller trimpot- like the single turn square cermet trimpots that Fry's did not have in stock. (I have the long 28 turn trimpots but thought it would be better to use something that displayed the setting visually.)


I was unable to locate a nice single turn cermet trim pot on short notice so I used the crappy ones that you used to be able to buy at the Rat Shack (an appropriate source of parts for my RAT 2.) The trim pot terminals being WAY too big for the copper pads vacated by removing the 47R and 560R resistor so I used 24GA tinned bus wire covered with heat shrink tubing to bring Mohammed to the mountain (or would that be the other way around? ) As it turned out the top trimpot would short out against the lower trimpot if I pushed it down too hard so I had this great idea to use quick set epoxy to secure the trim pots in place. I guess I should have waited for the epoxy to solidify a bit more because it flowed all over the nearby components some of which I had planned on replacing later for a further upgrade.
The trimpot that replaced the 47R resistor is the more important one. According to his uncle (who did this mod himself): "As you dial in the pot you get closer to stock Rat and can in fact REALLY hear when you get to the stock value. Almost like the pedal wakes up and is reborn to what it was (not necessarily a good thing) but just before that is the TONE!!" For me the experience was a little bit different- when you get close to 47R there is a big jump in the high frequency noise level which you can hear without playing your guitar. Back it off a little bit and adjust to taste while playing your guitar.
Tip: if you have a looper you can have that send the guitar signal while you experiment with different pot settings. For me what worked best with my current rig was setting the 47R/2.2uF trim pot to 126 ohms and the 560R/4.7uF trimpot to 440 ohms. Since most of the range of the 1k pots was not used I narrowed it down by adding a 680R resistor in parallel with the 47R/2.2uF trim pot and a 1k5 resistor in parallel with the 560R/47uF trim pot, which brought the maximum total resistance down to ~400 and ~600 respectively.
With the pedal reassembled you can access the two trim pots through the opening for the battery holder. I put heat shrink tubing on the shaft of a small screwdriver so that I could adjust the trim pots without having to worry about shorting out the signal to the case.
With these pots installed and adjusted I am pleased as punch with the sound of my RAT 2, and the Filter control now covers a very usable range (there is an interaction between the Filter control and trim pot that replaced the 47R resistor.) If you are building your own RAT you might consider adding a 4th control on top to replace that trim pot. BTW if I had more room I would have added another resistor in series with both of the trim pots to further narrow the range by setting a minimum ohms value as well as a maximum. I was lucky to fit in the two trim pots at all- I added the tapering resistors to the copper side of the board.
Steve Ahola
P.S. For a simpler mod you might just try replacing the 47R resistor with 120R and the 560R resistor with a 390R resistor.
P.P.S. My RAT 2 is serial number RT=3521xx. The markings on the PCB included "Pro Co Sound Inc" "RAT 3A REV B" and "SEC-5-0"
EDIT Not wanting to leave well enough alone there was one more thing that really bugged me about the RAT design: when you turn the Distortion control all of the way down it sounds like shit. I thought it sounded okay once you got up to 9:00 and I measured the resistance of the pot at that setting and it was around 2k ohms. So I desoldered the 100k Distortion pot and bent back the CCW terminal (#1) and soldered a 2k resistor to it, covering it with heat shrink tubing to prevent any shorts. Wow- that really opens up the low gain settings of the RAT. It was way too touchy before- you could sneeze and loose your setting either making it real loud or real soft. I rechecked the setting of my two trim pots and found that I really liked the combination of 36R and 360R (instead of the stock 47R/560R.) That is brighter than I had it before but it gives more growl to the neck pickup and if necessary I can always dial back the tone control when using the bridge pickup (my ESP LTD EC256FM has only a single tone control- this is the smoothest guitar I have ever played with jumbo frets and absolutely perfect action as shipped from Vietnam for the low low price of $299. The stock pickups are total crap but I pulled out a set of Seth Lovers from another guitar to fix that. Best.guitar.ever.)
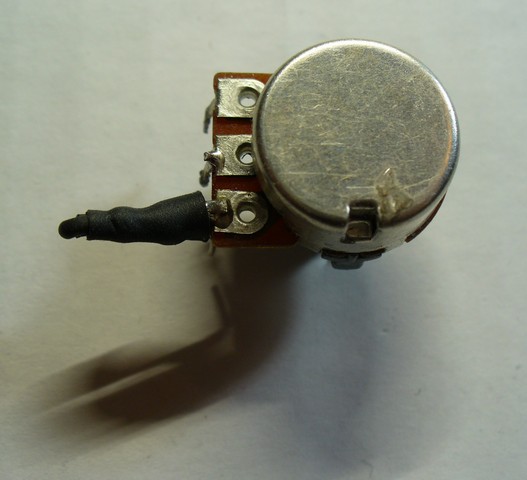
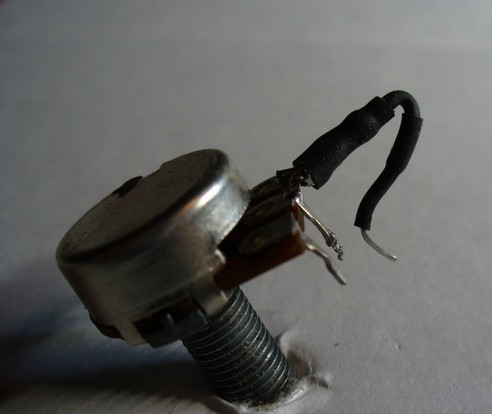
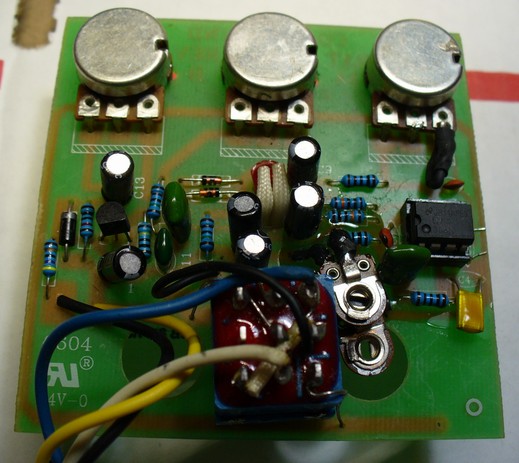
Okay here are pictures of the pot and the board. (I just learned that you can have no more than 7 images in a post and that includes smilies...)
P.P.P.S. I just figured out a trick to display a photo from my own computer in a larger size than you get when attaching it with a thumbnail. After attaching the photo from your computer preview your post and click on the thumbnail to display the full-sized image. Then right click to "copy image location" and paste it into the Insert Image From URL box and uncheck the box to retrieve the remote image. Voila! you now have a decent sized image in your post! (You don't want the original image to be too big or it will hog the whole screen- I cropped and resized my photo to around 600 x 400.) This trick saved me the trouble of uploading the photo to PhotoBucket or wherever just to be able to display it in-line and at a decent size.
Here is a link to the RAT schematic...
http://music-electronics-forum.com/a...-multi-rat.png
DIY Tube Guitar Amp Page
Ruetz was asked by his uncle to mod his RAT for a smoother tone and better low-end so his original "solderless" mod was to clip out the 47R resistor in series with the 2.2uF e-cap going to ground which is connected to pin 2 which would eliminate one of the two RC networks at the inverting input which shape the sound (the other RC network is a 560R resistor in series with a 4.7uF e-cap.)
I tried removing the 47R resistor from the circuit and the results were disastrous: it made the RAT sound like a typical overdrive pedal- and not that good of one at that! However his Ver 2.0 mod which was to replace the 47R resistor with a 500R to 1k trim pot worked really great and I took the optional step of replacing the 560R resistor with a 1k trim pot. The first photo is from the Ruetz site and shows the 47R resistor circled for the PCB used in my pedal. (On that board the 560R resistor is directly above the 47R resistor.) The second photo shows how I fitted in the huge trimpots on my own pedal and should be sufficient proof that you really need to use a smaller trimpot- like the single turn square cermet trimpots that Fry's did not have in stock. (I have the long 28 turn trimpots but thought it would be better to use something that displayed the setting visually.)
I was unable to locate a nice single turn cermet trim pot on short notice so I used the crappy ones that you used to be able to buy at the Rat Shack (an appropriate source of parts for my RAT 2.) The trim pot terminals being WAY too big for the copper pads vacated by removing the 47R and 560R resistor so I used 24GA tinned bus wire covered with heat shrink tubing to bring Mohammed to the mountain (or would that be the other way around?
) As it turned out the top trimpot would short out against the lower trimpot if I pushed it down too hard so I had this great idea to use quick set epoxy to secure the trim pots in place. I guess I should have waited for the epoxy to solidify a bit more because it flowed all over the nearby components some of which I had planned on replacing later for a further upgrade. The trimpot that replaced the 47R resistor is the more important one. According to his uncle (who did this mod himself): "As you dial in the pot you get closer to stock Rat and can in fact REALLY hear when you get to the stock value. Almost like the pedal wakes up and is reborn to what it was (not necessarily a good thing) but just before that is the TONE!!" For me the experience was a little bit different- when you get close to 47R there is a big jump in the high frequency noise level which you can hear without playing your guitar. Back it off a little bit and adjust to taste while playing your guitar.
Tip: if you have a looper you can have that send the guitar signal while you experiment with different pot settings. For me what worked best with my current rig was setting the 47R/2.2uF trim pot to 126 ohms and the 560R/4.7uF trimpot to 440 ohms. Since most of the range of the 1k pots was not used I narrowed it down by adding a 680R resistor in parallel with the 47R/2.2uF trim pot and a 1k5 resistor in parallel with the 560R/47uF trim pot, which brought the maximum total resistance down to ~400 and ~600 respectively.
With the pedal reassembled you can access the two trim pots through the opening for the battery holder. I put heat shrink tubing on the shaft of a small screwdriver so that I could adjust the trim pots without having to worry about shorting out the signal to the case.
With these pots installed and adjusted I am pleased as punch with the sound of my RAT 2, and the Filter control now covers a very usable range (there is an interaction between the Filter control and trim pot that replaced the 47R resistor.) If you are building your own RAT you might consider adding a 4th control on top to replace that trim pot. BTW if I had more room I would have added another resistor in series with both of the trim pots to further narrow the range by setting a minimum ohms value as well as a maximum. I was lucky to fit in the two trim pots at all- I added the tapering resistors to the copper side of the board.
Steve Ahola
P.S. For a simpler mod you might just try replacing the 47R resistor with 120R and the 560R resistor with a 390R resistor.
P.P.S. My RAT 2 is serial number RT=3521xx. The markings on the PCB included "Pro Co Sound Inc" "RAT 3A REV B" and "SEC-5-0"
EDIT Not wanting to leave well enough alone there was one more thing that really bugged me about the RAT design: when you turn the Distortion control all of the way down it sounds like shit. I thought it sounded okay once you got up to 9:00 and I measured the resistance of the pot at that setting and it was around 2k ohms. So I desoldered the 100k Distortion pot and bent back the CCW terminal (#1) and soldered a 2k resistor to it, covering it with heat shrink tubing to prevent any shorts. Wow- that really opens up the low gain settings of the RAT. It was way too touchy before- you could sneeze and loose your setting either making it real loud or real soft. I rechecked the setting of my two trim pots and found that I really liked the combination of 36R and 360R (instead of the stock 47R/560R.) That is brighter than I had it before but it gives more growl to the neck pickup and if necessary I can always dial back the tone control when using the bridge pickup (my ESP LTD EC256FM has only a single tone control- this is the smoothest guitar I have ever played with jumbo frets and absolutely perfect action as shipped from Vietnam for the low low price of $299. The stock pickups are total crap but I pulled out a set of Seth Lovers from another guitar to fix that. Best.guitar.ever.)
Okay here are pictures of the pot and the board. (I just learned that you can have no more than 7 images in a post and that includes smilies...)
P.P.P.S. I just figured out a trick to display a photo from my own computer in a larger size than you get when attaching it with a thumbnail. After attaching the photo from your computer preview your post and click on the thumbnail to display the full-sized image. Then right click to "copy image location" and paste it into the Insert Image From URL box and uncheck the box to retrieve the remote image. Voila! you now have a decent sized image in your post! (You don't want the original image to be too big or it will hog the whole screen- I cropped and resized my photo to around 600 x 400.) This trick saved me the trouble of uploading the photo to PhotoBucket or wherever just to be able to display it in-line and at a decent size.
Here is a link to the RAT schematic...
http://music-electronics-forum.com/a...-multi-rat.png
Attached Files