Announcement

Collapse
No announcement yet.

Fret job update

Collapse
X
 
  • Filter
  • Time
  • Show
Clear All
new posts

  • #16
    More on ramping...
    When you are lowering the action on a neck you will get to the point where the upper frets will "choke out" as you bend them. "Too far- need to go back a little!"

    Instead of that why not lower the frets that are choking the strings? That way you can have low action for the first 12 frets or so and still be able to play on the upper frets. Of course you want to make sure that the ramping is even so the upper frets play well.

    It's not something you want to do to all guitars or for all guitarists. Do it on a case by case basis. I will first level and crown the frets and see how it plays and responds to adjustments of bridge height and truss rod. If I am satisfied then I am done. If I think it needs a little ramping I will do it and check it out after recrowning the frets.

    Did I mention the Fret Rocker? That has been the most important tool in looking for high frets causing buzzing and choking...


    Here is where I learned about ramping...

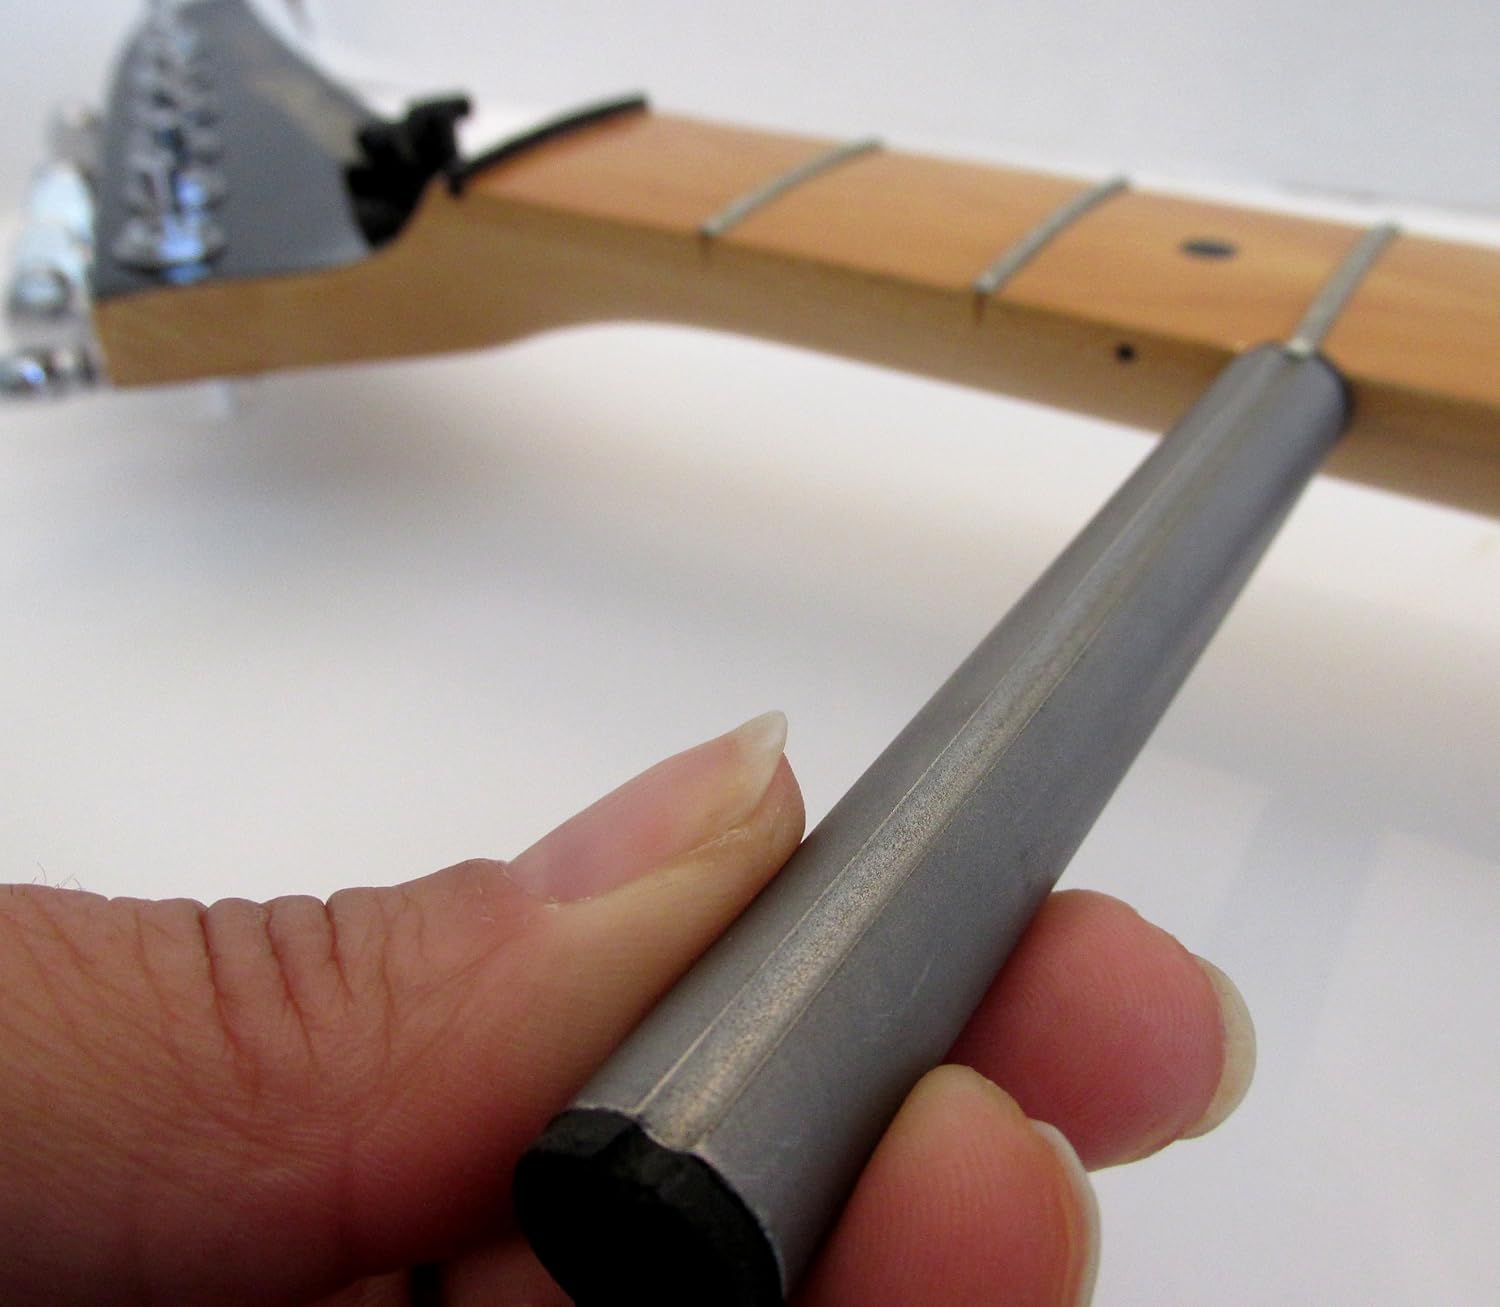
    This is the 9 inch Beam Fret Ramping Sander. The beam was cut to to length particularly to ramp the frets from the 13th fret. It is not long enough for properly leveling your fret height. Solid constructed thick 100% aluminum frame. High gloss Enamel baked finish. This Beam Sander comes from the Tommy Star Beam Collection of 3 Beam sanders available on E bay . Sizes come 20 14 and 9 in. Comes with 3 cuts of paper. This paper can be purchased by 50 ft rolls at your local lumber and tool stores. The price is about $7.50. One piece of paper will do 3 jobs. cost about 17 cents.

    Sanding down the fall off

    Step 1 Remove the strings
    Step 2 Carefully adjusting the neck to perfectly straight. Using a (quality) straight edge. Take your time this is a critical step
    Step 3 Color all your frets on the top with permanent black or blue marker from the 13th fret and tape over 14 th fret
    Step 4 Make a close inspection of all the frets to see if they are flat to the fret board
    If any frets are lifted correct the issue
    Step 5 Begin sanding the tops . Do not apply pressure let it glide freely
    the tool will do the work. For most drop off I have found very little needs to be removed.
    A close eye with magnification is needed so you won't sand lower than you need.
    Step 6 Look for the top of the fret to come through. When all are showing you should have a shiney line that is slightly getting wider as you get closer to the sound hole or pickups.
    Step 7 Take your fret rocker and go around the frets as a second check.
    Step 8 Dress the tops of the frets back to there normal shape.

    Luthiers Beam Sander for Fret Leveling and Neck Ramping | eBay
    The Blue Guitar
    www.blueguitar.org
    Some recordings:
    https://soundcloud.com/sssteeve/sets...e-blue-guitar/
    .

    Comment


    • #17
      Originally posted by Steve A. View Post
      More on ramping...
      Thanks Steve for putting this on the forum. I'm 98% amps, not all that much a neck & fret guy, but I have seen the necessity of ramping down the frets say from the neck/body joint on down to the end. Seen some LP's that were screaming for this kind of treatment, after 10-20 years many seem to get "zig zag" frets beyond the body connexion. Testing with the Fret Rocker confirms my suspicions. Properly ramped, seems that would be much more useful for those guitarists who solo way up there. I never got enough nerve to start grinding away at those frets, but I have advised some guitar owners to have it done.

      Also thanks for mentiioning that GMI fret end 'flushing' file. Does it help get that "bullet nose" shape to the fret ends? If it really does the trick it's worth the price. I've tried with regular files & can't really get it. Those that can - I tip my hat to you! LOTS of guitars need fret end help. It's awful to grab a guitar and feel that sawtooth effect.
      This isn't the future I signed up for.

      Comment


      • #18
        Originally posted by Leo_Gnardo View Post
        Also thanks for mentioning that GMI fret end 'flushing' file. Does it help get that "bullet nose" shape to the fret ends?
        I'll let you know after I move up to refret jobs- I am still in the Fret 101 class for fret leveling and dressing. (I have 40 years worth of guitars to practice on.)

        Steve A.
        The Blue Guitar
        www.blueguitar.org
        Some recordings:
        https://soundcloud.com/sssteeve/sets...e-blue-guitar/
        .

        Comment


        • #19
          Originally posted by Steve A. View Post
          John: It looks like those files have been discontinued but I'll keep searching for them. The specs said that it had a bastard cut instead of a second cut (or smooth cut.) But I also read that the fineness of a bastard cut can be related to the file length, at least for some files. So while a 10" bastard file would have a very rough cut, a 6 inch one would have a finer cut.
          I learned a lot about files going through the Nicholson catalog.

          My father was a Formica man and finish (Finnish?) carpenter so I inherited a whole shitload of files from him. While Sears used to have a very wide selection of files I picked up a set from them a few years ago that is completely useless- they are more like rasps than files!
          The one I have isn't a bastard, but instead a mill cut. I've had it for quite a while. I bought it at McFadden-Dale Industrial Hardware Las Vegas here in Vegas. I'll check to see if they still have them.

          I, being a finish carpenter / cabinet maker myself have installed literally tons of high pressure laminate. That stuff will ruin a file quickly. I'd buy them a few at a time.

          The flatter radii fingerboards need less ramping. The 15th fret is where I usually begin.

          Originally posted by Steve
          One more gadget I just HAD to buy- a 90/35 degree fret end tool...
          Nifty!

          Comment


          • #20
            Originally posted by Leo_Gnardo View Post
            . I never got enough nerve to start grinding away at those frets, but I have advised some guitar owners to have it done.
            You can first try tapping down a high fret. If that works but it pops back up later you can use superglue to hold the fret in place. Tip: put wax on the fretboard on either side of the fret so the superglue doesn't soak into the wood. Erlewine shows a tin of car paste wax but I think that paraffin might work, too. I use rubbing alcohol to remove the excess superglue before it sets but perhaps there is something better for that.

            You can do minor "grinding" with sandboards made by gluing sandpaper to tongue depressors or popsicle sticks, using 320 and 600 grit for starters. You can also use the sandboards for minor recrowning. We are talking about just a few high spots here as marked with a Sharpie using your fret rocker. Just fixing a few high spots can allow you to lower the action a little bit.

            It was always the recrowning that scared me off, looking at the luthiers with 20 years experience doing it with just a file- almost like brain surgeons! But the special tools available today make that possible even for mere mortals.

            Steve A.
            The Blue Guitar
            www.blueguitar.org
            Some recordings:
            https://soundcloud.com/sssteeve/sets...e-blue-guitar/
            .

            Comment


            • #21
              John_H: I suspect that the high-pressure laminates today are a lot harder than the Formica brand laminates available in the 50's and 60's.
              I had guessed that you were a machinist...

              Steve A.

              P.S. Is "mill cut" the same as "second cut" or "smooth cut" n the Nicholson catalog? Can you post the dimensions of your file? Total length and width & thickness of cutting surface (which is how I finally figured out to differentiate between cantwell and regular triangular files.) BTW Frank at frets.com is apparently better at guitarwork than math as he mentioned that regular triangular files have 45 degree angles... or is there a 3-sided file with angles of 90, 45 and 45?

              It might be better to just bite the bullet and just pay $38 + s/h for the StewMac one... I almost added it to my order the other night but I don't think I'll need it until I get into custom crown shapes- that seems to open up a whole new world in fretology! Like the backside of the fret could be shaped differently than the front side- right?

              One more question re: ramping. So you would put the masking tape on the 14th fret to start the ramp at the 15th fret?
              Last edited by Steve A.; 07-30-2014, 09:28 PM.
              The Blue Guitar
              www.blueguitar.org
              Some recordings:
              https://soundcloud.com/sssteeve/sets...e-blue-guitar/
              .

              Comment


              • #22
                Originally posted by Steve A. View Post
                One more gadget I just HAD to buy- a 90/35 degree fret end tool...

                G M I Fret End Beveling Flushing Files 35 Degrees and 90 Degrees Luthier Tool | eBay

                I heard that sharpening stones work great, too, but I want that angle to be exact. I would normally choke on a $14 shipping charge on a $34 product but it did come all of the way from Greece...

                I suspect that this is an original design from G.M.I. since it is not available anywhere else.


                Steve A.
                I use an older stew-mac version of this, but it doesn't have the 90° file. They are very useful.
                It would be possible to describe everything scientifically, but it would make no sense; it would be without meaning, as if you described a Beethoven symphony as a variation of wave pressure. — Albert Einstein


                http://coneyislandguitars.com
                www.soundcloud.com/davidravenmoon

                Comment


                • #23
                  Originally posted by Steve A. View Post
                  John_H: I suspect that the high-pressure laminates today are a lot harder than the Formica brand laminates available in the 50's and 60's.
                  I had guessed that you were a machinist...
                  Nope, just an ol' carpenter. HPL's haven't changed much. They're mostly melamine, and paper.

                  P.S. Is "mill cut" the same as "second cut" or "smooth cut" n the Nicholson catalog? Can you post the dimensions of your file? Total length and width & thickness of cutting surface (which is how I finally figured out to differentiate between cantwell and regular triangular files.) BTW Frank at frets.com is apparently better at guitarwork than math as he mentioned that regular triangular files have 45 degree angles... or is there a 3-sided file with angles of 90, 45 and 45?

                  It might be better to just bite the bullet and just pay $38 + s/h for the StewMac one... I almost added it to my order the other night but I don't think I'll need it until I get into custom crown shapes- that seems to open up a whole new world in fretology! Like the backside of the fret could be shaped differently than the front side- right?
                  Mill finish is smooth finish. The file I use has a cutting surface that measures 6" by 1/2 wide on the big face 3/8 on the smalls.

                  I'd try to get good with a file first. The specialty tools don't possess any intrinsic skills.

                  I don't see where an irregular shaped crown would be any benefit

                  One more question re: ramping. So you would put the masking tape on the 14th fret to start the ramp at the 15th fret?
                  It depends on the fingerboard radius. a flatter board requires less ramping.

                  Comment


                  • #24
                    John- When you said that you often start ramping at the 15th fret did you mean that was the first fret sanded or the last fret left unsanded?

                    As for a non-symmetrical crown the side facing the bridge could have a sharper angle, perhaps for a clearer sound...?

                    And yes I would practice using a file on one of my junkers first. I think that the fancy diamond grit crowning tool would work faster after a preliminary shaping with the luthiers cantsaw file.

                    Thanks!

                    Steve
                    The Blue Guitar
                    www.blueguitar.org
                    Some recordings:
                    https://soundcloud.com/sssteeve/sets...e-blue-guitar/
                    .

                    Comment


                    • #25
                      Dept of Corrections

                      #1 A regular 24" straightedge will work just as well (if not better than) a notched straightedge for most tasks. One exception would be a fretboard with very uneven wear. Also, once you start leveling frets the notched straightedge is handy when putting the strings back on for testing as you work along. (Whenever possible I will tape down the loosened strings when working on the frets so I can quickly check my work as I go along. Of course I would replace at least the plain strings for the final test...)

                      #2 When Frank Ford was referring to the 45 degree angle on a triangular file I think he was referring to a cantsaw files with angles of 90, 45 and 45. The large angle on the file he uses is 105 or 108 degrees with the other angles being around 38 degrees. So I think that I will eventually buy them one at StewMac as I suspect that most cantsaw files are 90, 45 & 45.

                      Steve A.
                      The Blue Guitar
                      www.blueguitar.org
                      Some recordings:
                      https://soundcloud.com/sssteeve/sets...e-blue-guitar/
                      .

                      Comment


                      • #26
                        Originally posted by Leo_Gnardo View Post
                        Also thanks for mentiioning that GMI fret end 'flushing' file. Does it help get that "bullet nose" shape to the fret ends? If it really does the trick it's worth the price. I've tried with regular files & can't really get it. Those that can - I tip my hat to you! LOTS of guitars need fret end help. It's awful to grab a guitar and feel that sawtooth effect.
                        I just finished lowering the frets on my LTD EC-256FM going from Xtra Jumbo to a Gibson Medium Jumbo and it was great except for the damned fret ends which just didn't feel right. So I got out the GMI tool and gave it a whirl starting on the bass side just in case I screwed up. It gave me a nice 35 degree angle on all of the frets but the edges were still sharp. So I got out my $26 diamond grit crowning tool and crowned the ends of the frets. Perfect bullet shape!


                        http://www.amazon.com/Neck-Check-Gui...&sr=1-3&dpPl=1

                        This tool is really amazing for the price. I start off with the 2 sided StewMac fret tool and then finish it off with the $26 tool which gives it a very round crown and a very smooth finish.


                        I just got the $66 StewMac diamond fret tool on Saturday and was disappointed to find that it lowered the fret while recrowning it. Not the best thing right after leveling the fretboard. (The $26 tool shapes the crown without removing anything from the top as a "crowning tool" should. With a 'fret file" you are on your own...)

                        So for bullet fret ends file them at a 35 degree angle after leveling the frets and then during the crowning process crown the ends of the frets as well as the tops. You can do it in one motion curving the tool around when you reach the end of the fret.

                        You don't need the GMI file but one thing really cool about it is that you can use it for all of the frets on a set neck guitar. The file goes to the very end of the block and doesn't stick out much (.220") so it doesn't scratch the top of the guitar.

                        Steve A.

                        EDIT For a full bullet shape you probably want to round the end of the fret a little bit, looking down at the top of the fret. On my PRS SE there wasn't enough fret for a bullet so I had to round the end a bit just to get a good shape from it.

                        Too much ramping... yes I got carried away and with too much of a ramp you lose the great action. No problem-o... I'm still learning so I will relevel the frets a bit and recrown them.
                        Last edited by Steve A.; 08-05-2014, 10:57 PM.
                        The Blue Guitar
                        www.blueguitar.org
                        Some recordings:
                        https://soundcloud.com/sssteeve/sets...e-blue-guitar/
                        .

                        Comment


                        • #27
                          Originally posted by Steve A.
                          Too much ramping... yes I got carried away and with too much of a ramp you lose the great action. No problem-o... I'm still learning so I will relevel the frets a bit and recrown them.
                          Bummer, it doesn't take much ramping to be effective. How much neck relief are you using?

                          Comment


                          • #28
                            Originally posted by John_H View Post
                            Bummer, it doesn't take much ramping to be effective.
                            That is what I learned! I decided to promote this guitar to my "to be refretted" pile and it is the first in line. This is a $250 guitar- I thought it would be a good one to practice on before moving up to one of my PRS SE's.

                            (Actually I am first practicing on a trashed PRS SE Soapbar II- the one I routed out for SD stacked P-90's only to find that removing too much of the tenon weakened the neck joint past the point of return.)

                            Learning moment: when routing out a pickup cavity the bottom does not have to be completely flat. Rout a small channel for the cable if necessary rather than taking another 1/8" out of the pickup cavity.

                            How much neck relief are you using?
                            Very little compared to how I used to set my truss rods- definitely a candidate for the archery range. (I had no idea what truss rod adjustments actually did until I got my 24" straight edge.)

                            Steve A.

                            P.S.
                            Last edited by Steve A.; 08-13-2014, 05:48 AM.
                            The Blue Guitar
                            www.blueguitar.org
                            Some recordings:
                            https://soundcloud.com/sssteeve/sets...e-blue-guitar/
                            .

                            Comment


                            • #29
                              Like most things, you'll gain skill, and confidence with some practice. Develop a technique that works for you, and stick with it. Try to be as consistent as you can in all parts of the process, and it will show in your results.

                              It sounds like you're about ready to do a re-fret to me. Have you pulled any frets yet?

                              Comment


                              • #30
                                Originally posted by John_H View Post
                                It sounds like you're about ready to do a re-fret to me. Have you pulled any frets yet?
                                Yes, I just got the $26 fret puller from Stew-Mac the other day (the cheapie I bought on eBay was just end nippers ground down a bit- it worked on perfect frets but just mangled up other ones.) I've been pulling frets off of guitars with bound necks- marking the frets with hash marks using a fine tip Sharpie paint pen so that I can duplicate the tang lengths fret by fret.

                                I just got some Titebound Liquid Hide Glue for setting the frets (this is the procedure my friend learned from a pro.) I am going to use my 8" long radiused blocks as a gluing caul to hold the frets in place. I think that I will need to use thin superglue to glue the fret ends to the binding. The hide glue is to increase the acoustic/vibrational coupling between the frets and the neck for a better sound and more sustain. Hide glue cleans up with water and you can remove the frets later after applying heat (any suggestions for the wattage of a soldering iron to heat the frets?)

                                Steve A.

                                P.S. I still need to get the $28 Stew-Mac fret cutter. For the time being I ground down a Husky end cutter from Home Depot to cut frets without damaging the crown.
                                The Blue Guitar
                                www.blueguitar.org
                                Some recordings:
                                https://soundcloud.com/sssteeve/sets...e-blue-guitar/
                                .

                                Comment

                                Working...
                                X