 Tweet
Tweet
Motivated by “1ampman’s” post on the Peavey Classic 30 Power Transformer thermal fuse, I grabbed the latest Fender Deluxe Reverb power transformer I had set aside for the day I felt inspired to tear it down to see if I could find where they buried the thermal fuse in series with it’s primary winding.

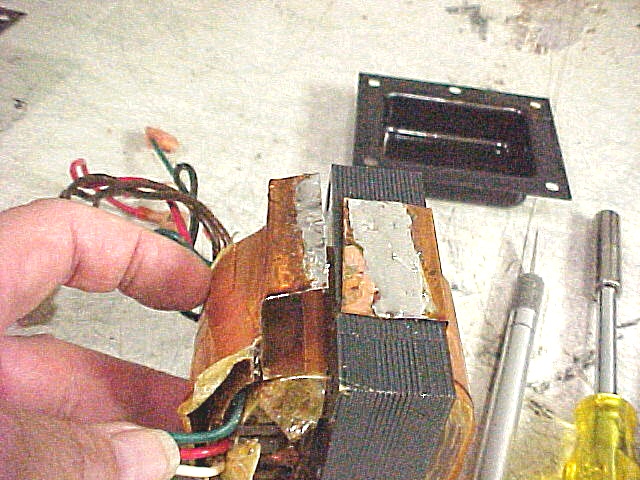


As usual, the vacuum impregnation of varnish hinders getting the core bolts’ nuts off. Then, you have to pry off the end bell just to get started, which can be a chore all its’ own. On this one, there’s also the copper flux band that has to be desoldered so you can get at the next obstacle…the multiple layers of fish paper insulation. I made a careful cut with an Xacto knife to open it up, finally exposing the transformer primary and secondary wire terminations.


Looking closely, I found the thermal fuse near the core under all the windings. Next to a wooden dowel is an insulated tube (cable jacket?) that houses the axial lead thermal fuse. Following the leads of both ends of the fuse leads, I verified it soldered to the black primary lead at one end, and to the magnet wire of the primary winding at the other end. I unsoldered and unwound both ends of the thermal fuse leads.


Then, stretching out the leads flat, I was able to drive out the thermal fuse with a hex driver, carefully hammering it out of the tubing. That revealed a 142 deg C 10A thermal fuse, which measured open, of course. 142 deg C. Interesting rating, considering the transformer only has Class B insulation system (130 deg C), I presume. I doubt if it is Class C (180 deg C).
Now, this exercise took a good hour to finally dig the fuse out. The replacement cost of the transformer is $75 + shpg. I’ll still have to locate, order & replace the thermal fuse. I would also make use of the hi temp insulation sleeving from the existing thermal fuse when installing the new thermal fuse. The primary measured about 4 ohms. I still have to jumper the primary lead to the winding and check it on my power analyzer/variac to verify there’s not further issues that caused the transformer’s thermal fuse to open. Then, closing it all back up without causing any safety issues, since the insulation & tapes have all been cut thru to get at the fuse.
As usual, the vacuum impregnation of varnish hinders getting the core bolts’ nuts off. Then, you have to pry off the end bell just to get started, which can be a chore all its’ own. On this one, there’s also the copper flux band that has to be desoldered so you can get at the next obstacle…the multiple layers of fish paper insulation. I made a careful cut with an Xacto knife to open it up, finally exposing the transformer primary and secondary wire terminations.
Looking closely, I found the thermal fuse near the core under all the windings. Next to a wooden dowel is an insulated tube (cable jacket?) that houses the axial lead thermal fuse. Following the leads of both ends of the fuse leads, I verified it soldered to the black primary lead at one end, and to the magnet wire of the primary winding at the other end. I unsoldered and unwound both ends of the thermal fuse leads.
Then, stretching out the leads flat, I was able to drive out the thermal fuse with a hex driver, carefully hammering it out of the tubing. That revealed a 142 deg C 10A thermal fuse, which measured open, of course. 142 deg C. Interesting rating, considering the transformer only has Class B insulation system (130 deg C), I presume. I doubt if it is Class C (180 deg C).
Now, this exercise took a good hour to finally dig the fuse out. The replacement cost of the transformer is $75 + shpg. I’ll still have to locate, order & replace the thermal fuse. I would also make use of the hi temp insulation sleeving from the existing thermal fuse when installing the new thermal fuse. The primary measured about 4 ohms. I still have to jumper the primary lead to the winding and check it on my power analyzer/variac to verify there’s not further issues that caused the transformer’s thermal fuse to open. Then, closing it all back up without causing any safety issues, since the insulation & tapes have all been cut thru to get at the fuse.

Comment