Announcement

Collapse
No announcement yet.

1966 Guild T1 RVT - REVERB not working

Collapse
X
 
  • Filter
  • Time
  • Show
Clear All
new posts

  • 1966 Guild T1 RVT - REVERB not working

    Hi all,

    this is a nice little amp with a particular (and new for me) reverb circuit.

    I was helping a friend to re-cap it during the lockdown using videocalls and making shopping lists together on Mouser.

    Somehow he's lost the REVERB in the process (it worked when he bought the amp) and now I have the amp with me and trying to bring it back to life.

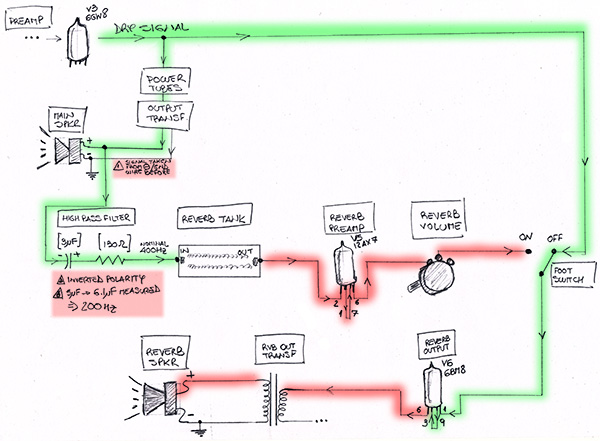
    Here is the SCHEMATIC

    What's new for me is that the AUDIO SIGNAL that feeds the REVERB circuit is coming from one of the wires going from the OUTPUT TRANSFORMER to the MAIN SPEAKER and that the unit has a DEDICATED REVERB SPEAKER (smaller) which also plays the DRY signal when the REVERB is OFF.

    I've been following the signal path in two ways:

    - CIRCUIT as in the SCHEMATIC:

    first there were a few wiring issues that I corrected
    - the REVERB feed signal was being taken from the NEGATIVE SPKR wire (which is also connected to ground). So there was no signal. Actually the speaker connector to the circuit was inverted.
    - The electrolytic capacitor polarity was replaced with a new one and the polarity was inverted

    additionally:
    - the value of the e-cap is not the 3 uF indicated on the schmatic (the closer we could get was 5 uF wich actually measures 6.1 uF). So the frequency is cut below 200 Hz instead of 400 Hz as intended originally (but I guess this is more a matter of taste than a potential functional problem)
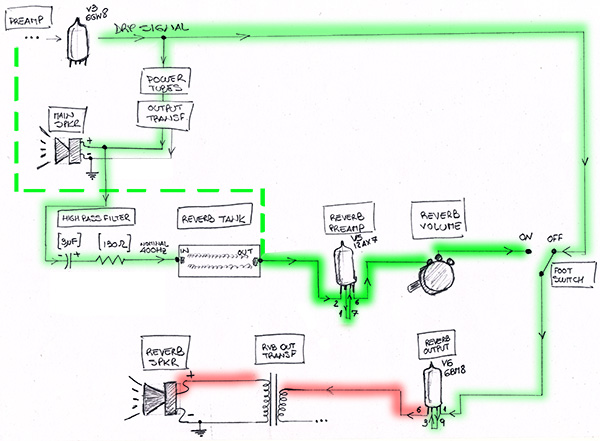


    Here I see that:
    - the REVERB SIGNAL is lost after the REVERB TANK INPUT
    - the DRY signal is lost after when trying to come out of the V6 tube Pin 6

    - Feeding signal to the REVERB TANK OUT

    to check the rest of the circuit after the REVERB TANK


    the schematic is missing any reference voltages other than the HV right after all the big capacitors so I am not sure of what voltages to expect at the REVERB TANK (I guess some is needed to drive the transducers unless they are driven only by the magnet) or at the 6BM8 V6 tube.

    6BM8 V6 tube VOLTAGES:

    PIN 1: 0 VDC
    PIN 2: +60VDC
    PIN 3: 0 VDC
    PIN 6: +340 VDC
    PIN 7: +340 VDC
    PIN 8: +1.6 VDC
    PIN 9: +146 VDC


    any ideas of how to continue troubleshooting this one?

    thanks!
    Last edited by TelRay; 06-24-2020, 01:29 AM.

  • #2
    Have you checked that transducers or connections to the tank are not open?
    "I took a photo of my ohm meter... It didn't help." Enzo 8/20/22

    Comment


    • #3
      What is the resistor at pin2 of 6BM8 measuring, and does it match it's colour code?
      Originally posted by Enzo
      I have a sign in my shop that says, "Never think up reasons not to check something."


      Comment


      • #4
        Originally posted by The Dude View Post
        Have you checked that transducers or connections to the tank are not open?
        yepp... checked continuity between all GREEN DOTs with MMT and then the BLACK dots in the photo below, both transducers checked

        Comment


        • #5
          Originally posted by g1 View Post
          What is the resistor at pin2 of 6BM8 measuring, and does it match it's colour code?
          it measured 335 Ohm (without taking it out of the circuit)

          I need to re-check this area of the circuit because the ecap across this resistor is new, so potentially a problem there

          Comment


          • #6
            60V across 335R is around 180mA, which seems quite high.
            Is it marked as a 330R ?
            Originally posted by Enzo
            I have a sign in my shop that says, "Never think up reasons not to check something."


            Comment


            • #7
              60V across a 330R cathode resistor simply can't be. It would mean a plate dissipation of around 50W, OTOH a bias voltage of 60V would mean cut-off.
              Sure, it's not 6V instead?
              - Own Opinions Only -

              Comment


              • #8
                Originally posted by Helmholtz View Post
                60V across a 330R cathode resistor simply can't be. It would mean a plate dissipation of around 50W, OTOH a bias voltage of 60V would mean cut-off.
                Sure, it's not 6V instead?
                I calculated approx. 10W plate diss., not 50W ?
                I am more inclined to cut-off though, as you say. Maybe cathode is not connecting right?

                Edit: 10W is resistor diss., not plate. oops
                Last edited by g1; 06-24-2020, 05:52 PM.
                Originally posted by Enzo
                I have a sign in my shop that says, "Never think up reasons not to check something."


                Comment


                • #9
                  Originally posted by g1 View Post

                  I calculated approx. 10W plate diss., not 50W ?
                  I am more inclined to cut-off though, as you say. Maybe cathode is not connecting right?
                  I was speaking about plate dissipation - not resistor dissipation.
                  Actaully cathode bias shouldn't be able to cause tube cut-off.
                  - Own Opinions Only -

                  Comment


                  • #10
                    hi guys, thank you for the comments

                    1) +60VDC at V6PIN 2

                    as I said, there's something odd going on around that 50 uF ecap that goes from PIN 2 to ground and has the 330 Ohm R across
                    I measured +60V directly on PIN 2, got 0 V at the lead of the resistor connected to PIN 2 and 15 V at the ecap. I know I should be getting the same voltages as al 3 points are connected and continuity test confirms they are. Additionally , that ecap is rated at 25V so I already know I shouldn't be getting 60 V.
                    I have disassembled this part of the circuit (it's an add-on with a separate board) and seen my friend placed a jumper because the board got damaged when replacing the ecap. So I will be investigating deeper.

                    2) OTHER HIGH VOLTAGE LINES

                    these are the voltage I am reading (numbers correspond to those in the schematic)
                    1. +365 VDC [Nominal 335 V]
                    2. +322 VDC [Nominal 300 V]
                    3. +271 VDC [Nominal 250 V]
                    4. +313 VDC [Nominal 290 V, but a bit hard to read on the schematic]

                    up to here voltages are below 10% higher than what's specified on the schematic (I am feeding 117 VAC to the circuit) however voltages 1 and 2 fluctuate +/- 5-7 V. This maybe normal as the rectifier is a tube (and not a solid state diode).
                    Voltages 3 through 6 do not fluctuate in more than +/- 1V

                    and now the two voltages that feed the REVERB circuit are too high +55-65% more though I've checked the 1.5K 10W, 1K 10W and 22K resistors and they are all OK

                    5. +370 VDC [Nominal 225 V]
                    6. +369 VDC [Nominal 205 V, but hard to read on the schematic]

                    but... there's another thing
                    the voltage coming out of the DIODE rectifying the negative voltage is -19V. I cannot read wht the schematic shows here.
                    and the two resistors (they seem old, I am not sure if original) are 10K and 4.7K when in the schematic (with a lot of effort) I want to read 68K and 33K
                    I see the ratio is about the same: 10K/4.7K (almost) = 68K/33K

                    In any case, I am concentrating my efforts on the REVERB circuit by now so, understanding what the hell is going on with VOLtAGES 5 and 6 s the priority

                    PS: all the big ecaps are new

                    Originally posted by g1 View Post
                    60V across 335R is around 180mA, which seems quite high.Is it marked as a 330R ?
                    yessir... triple checked and measured now lifting the resistor as i am reworking the damaged circuit trace

                    Last edited by TelRay; 06-25-2020, 12:38 AM.

                    Comment


                    • #11
                      After the trace repair, with the tube out see if you measure 330R from pin2 of the socket to ground (check at tube side of socket pin).
                      And you should also read 330R across the 50uF in circuit.
                      Originally posted by Enzo
                      I have a sign in my shop that says, "Never think up reasons not to check something."


                      Comment


                      • #12
                        OOOKK... a lot of work done this evening: traces rebuilt, redid most of the new components solderings, changed some dubious looking wiring, etc.
                        and now... there is REVERB sound... very low in volume, but it's there

                        Originally posted by g1 View Post
                        After the trace repair, with the tube out see if you measure 330R from pin2 of the socket to ground (check at tube side of socket pin).
                        And you should also read 330R across the 50uF in circuit.
                        yessir... there is now 331 Ohm from V6 PIN 2 to GND and also +15VDC. It seams that repair did some good

                        Now VOLTAGES 5 and 6 (feeding the REVERB circuit) are also what they should:

                        5. +206VDC [Nominal 225 V]
                        6. +192 VDC [Nominal 205 V, but hard to read on the schematic]

                        At V6 B6M8 I am getting

                        PIN 1: 0 VDC
                        PIN 2: +15VDC
                        PIN 3: 0 VDC
                        PIN 6: +193 VDC
                        PIN 7: +202 VDC
                        PIN 8: +1.0 VDC
                        PIN 9: +88 VDC

                        At V5 12AX7

                        PIN 1: +122 VDC
                        PIN 2: 0VDC
                        PIN 3: +1.0 VDC
                        PIN 6: +123 VDC
                        PIN 7: 0 VDC
                        PIN 8: +1.0 VDC
                        PIN 9: 0 VDC

                        As I read the cricuit the small REVERB SPEAKER should work like this:

                        - REVERB SWITCH ON: REVERB sound
                        - REVERB SWITCH OFF: DRY Guitar sound

                        What I am getting now is very low reverb sound with the switch ON and no sound at all (in this speaker, there is sound on the big one) in the OFF position

                        I am going to check the REVERB VOLUME potentiometer wirint (which I have replaced). Could I have inverted the wiring to lugs 1 and 3?

                        Comment


                        • #13
                          OK, so th reverb speaker makes either really low reverb or really low dry. SInce you get no dry signal, I am going to assume the reverb control is not involved. It isn't even in the circuit with reverb OFF. SOmething in the reverb speaker amp is not right. COuld be anywhere from the switch itself to the speaker itself.
                          Education is what you're left with after you have forgotten what you have learned.

                          Comment


                          • #14
                            Originally posted by Enzo View Post
                            OK, so th reverb speaker makes either really low reverb or really low dry. SInce you get no dry signal, I am going to assume the reverb control is not involved. It isn't even in the circuit with reverb OFF. SOmething in the reverb speaker amp is not right. COuld be anywhere from the switch itself to the speaker itself.
                            Enzo, your comment made me question what I hear so I hooked the scope right after the footswitch (marked with an "A" in the schematic). Concretely I put the probe between the 1K and 330K resistors because here I will see the signals coming both from the REVERB and DRY.

                            Click image for larger version

Name:	Untitled-1.jpg
Views:	273
Size:	57.9 KB
ID:	908227

                            And... there is a signal from BOTH (wet and dry). I believe that with the low volume at the REVERB SPEAKER I could not tell when the DRY signal was coming out (because it is no different to the one coming out of the MAIN SPEAKER).

                            Here is the level of the REVERB signal at that point (remember my old scope is always tilted clockwise):

                            Click image for larger version  Name:	IMG_E1140.JPG Views:	0 Size:	1.06 MB ID:	908226

                            The DRY signal is a bit weaker... by about 10 mV (I'm counting 5 mV on top and another 5 at the bottom of the wave)

                            So I belive I do not have a problem up to this point, so there is an amplification issue after.

                            What I am thinking is to follow the signal and evaluate that every stage is incrementing the signal in the desired amount.

                            Is there any kind of a guideline to say something like:

                            - 1 mV input at 6MB8 pin 1
                            - 10 mV at 6MB8 pin 9
                            - 50 mV at 6MB8 pin 6
                            - 500 mV at the (+) REVERB SPEAKER terminal

                            thanx!

                            Comment


                            • #15
                              See how much signal you can get at pin3 (control grid of pentode section) of 6BM8 with fairly hot settings of amp and reverb level. Should be able to get several volts I would think.
                              Originally posted by Enzo
                              I have a sign in my shop that says, "Never think up reasons not to check something."


                              Comment

                              Working...
                              X