Announcement

Collapse
No announcement yet.

New amp build with pictures

Collapse
X
 
  • Filter
  • Time
  • Show
Clear All
new posts

  • New amp build with pictures

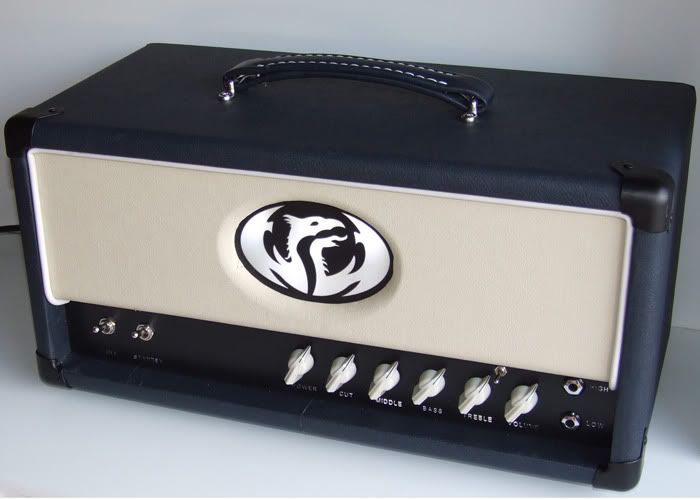
    I thought I would share this here and get some feedback too, this is my latest amp I finished. I used a different vinide type covering that has absolutely no stretch in it and I also used a Super PVA glue instead of the stuff I normally use.

    The Vinide was great to work with except around the logo, the material I used before had some stretch so I could pull it around the bevelled edge without having to do little triangular cut outs, but the vinide is like traditional covering materials i.e...tougher
    What happens when you apply heat to normal tolex materials.. do they shrink or stretch.. I think I might try that next time but I didn’t want to ruin this one

    The Super PVA glue worked on the flat sections, but was a PIA for the corners, so back to the old contact adhesive for the next build.

    This is the first time I have done a light up logo and faceplate, I used Ultra bright LED’s, cam out pretty well. Need to remember next time to move the cage nut position so that it doesn’t block the light on the faceplate.

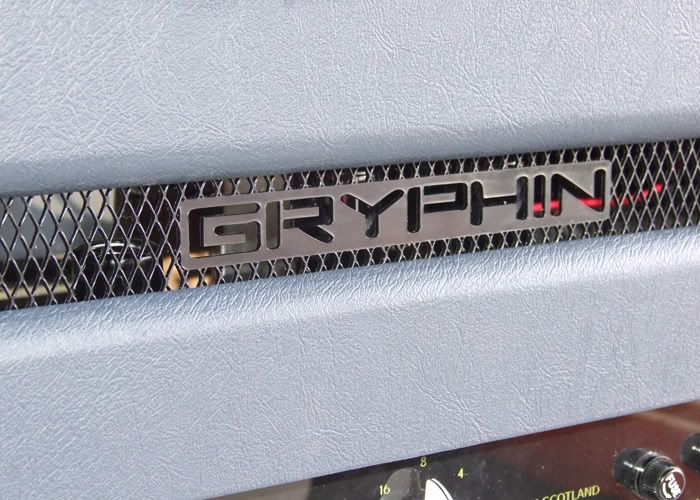
    The rear vent mesh was made on a laser machine.. Its just acrylic so it doesn’t have major strength, but its functional and was a nice finishing touch… I thought anyway.


  • #2
    Mate! That's just beautiful.

    Edit: What kind of amp design is it?

    Comment


    • #3
      cool, thanks

      The amp is a 2 x 6v6 cathode biased amp, I will do some videos when I get the time/house. its more vintage than modern...

      Comment


      • #4
        Just saw this thread and yep that detail on the front and back looks very good. I'm about to try a backlit logo myself, can I ask what you did for the led power supply or positioning?

        Comment


        • #5
          Thanks, I used Utlrabright LED, I had tried 6.3v lamps before but wasn’t happy enough with them and they use allot more current.

          The PT I used had an unused 6.3v winding, So bridge rectified, filtered and used separate a dropping resistor for each LED.

          I did try run the lamps on AC but I ended up with some buzz, hence why I changed to DC, I might try AC with the diodes again
          on another build but the layout would need a bit more thought than I gave this amp.

          Comment


          • #6
            That is a nice piece of work mate top notch.
            I'm just starting my 1st project I'm making a 2x12 speaker cab for my son.Not has complicated has your work.
            If you don't mind could you tell me where you got the mesh made and where you buy your vinyl and Tolex. i'm thinking that a nice mesh with a logo over the speakers would be good. I've tried sourcing on the internet the Tolex is easy to find but i can't find the mesh.

            Comment


            • #7
              Where are you?

              I made the mesh myself, I have a laser engraving/cutting machine that turns this type of stuff out easily, I do offer a custom service. PM me if you want more info.

              If you are in the USA you may want to contact Amplates or BNP lasers.

              If I was going to improve the mesh idea I would get it cut into aluminium by a sheetmetal worker or use aluminium mesh and a screw on plastic logo.

              Comment


              • #8
                wow, that cab looks fantastic. I'll be making one soon for a new amp (the Phaez DC10 kit). I'll definitely try my luck with tolex, but I haven't decided what to put on the front or back panels. I was thinking a clear plexi or lexan panel up front, but now I might try my luck with a recessed front logo. Did you apply the tolex-like covering before fixing the front panel to the rest of the cab? How deep is the recess? Any pics or videos of the LEDs? I don't see them in the photos above...

                -- John

                Comment


                • #9
                  Nice build! I liked the "Gryphyn" etched plate embedded in the mesh as well, great work there.
                  Valvulados

                  Comment


                  • #10
                    Thanks Guys

                    The front logo is recessed ~9mm back. Next time I will make it ~6mm so that I can stretch the material around the whole shape without having to use filling triangles.

                    The LED’s are mounted to the top wall of the cab, they had to go there because there is a transformer 1 inch behind the logo. Next time I will ensure I have left space behind the logo on the chassis so that the led board can go on top of the chassis. I just used eyelets and G10 FR4 to make the board. I left a bit of length on the LED leads so that I could direct the light to where I wanted after everything was installed.

                    Mike

                    Comment


                    • #11
                      As a general rule, newer builds tend to be better than the older ones, unless the builder is addicted to drugs and his mind is deteriorating.

                      When you find a collection-worthy amplifier and the older ones are more expensive, it's only for the historical reason, and likely not for technical ones. You can be sure the newer builds by Dumble are better than his older ones.

                      So IMHO you're on the right path there, moving parts here and there, perfecting this and that....that's what it's all about.

                      Every amp that I hand built(more than 10, less than 100) had improvements from the older ones. I have here with me my very first build. I call it Bob Marley wiring because it looks exactly like his hair did.
                      Valvulados

                      Comment

                      Working...
                      X