Announcement

Collapse
No announcement yet.

20/10/10 cap can for Supro 1624

Collapse
X
 
  • Filter
  • Time
  • Show
Clear All
new posts

  • 20/10/10 cap can for Supro 1624

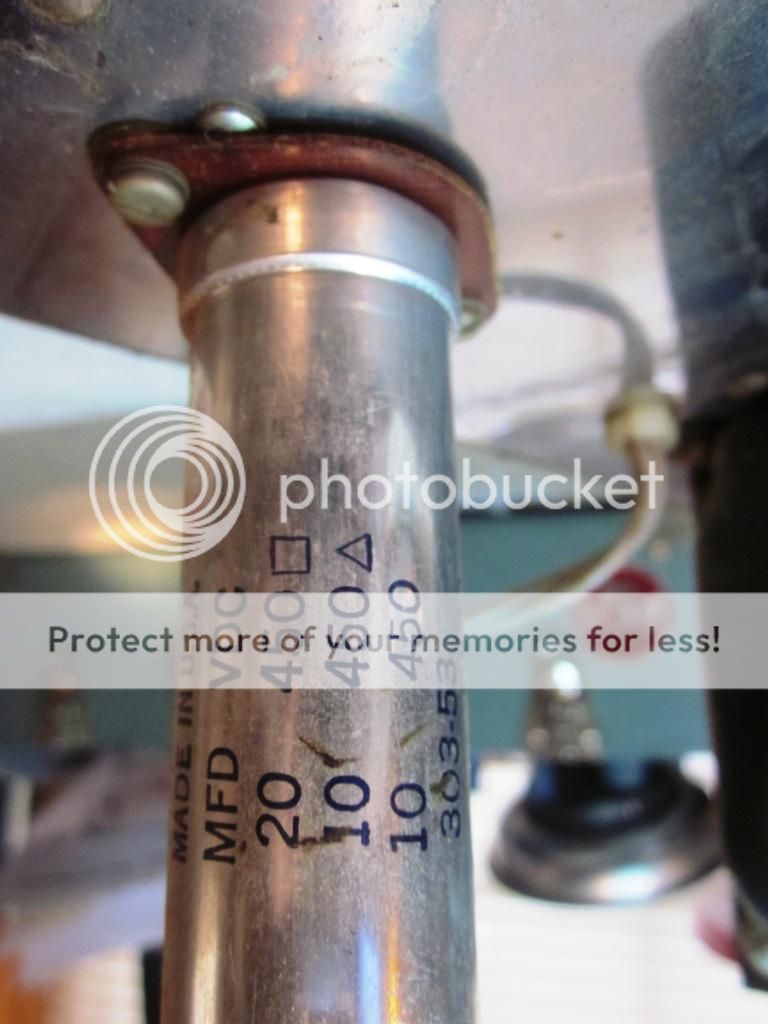
    Have a bone stock 1962 Supro Model 1624 and am trying to source a direct replacement for the stock Mallory 20/10/10 @ 450 cap can. There really isn't all that much room inside the chassis to put a terminal strip and individual caps.

    The problem I'm running into is the diameter of the can. The stock can is 1" in diameter and the replacements I'm finding are all 1 3/8" and I am dead set against making the hole larger to accommodate the currently available cap cans. The amp has never been touched and all it needs is the replacement cap can and the two 35/50s.

    Open to any ideas that'll help preserve this beauty the way it is now.


  • #2
    Looks like lots of room.

    The three caps don;t need to be in the same place, note your can is connected to the circuit by wires trailing off here and there. Cans can be soldered to the theres instead of to here.

    Is the can itself grounded somewhere other than chassis? I can't see where the yellow wire goes. Cans have two kinds of mounting wafers, metal ones for grounding and the phenolic ones like yours, used to insulate the can from the chassis. Then again that cap doesn;t look original to me, what with the mounting wafer sitting in top of some other screw.

    Consider a two section cap with just one loose cap under the chassis if space is still an issue.


    All the existing terminal strips run horizontally in the photo. If I needed to mount a small strip, I;d use the left screw on the can cap and run the strip crosswise instead of parallel to the others. I see some empty ground lugs on the ends of that terminal strip right in front of us over that small transformer.
    Education is what you're left with after you have forgotten what you have learned.

    Comment


    • #3
      Hey Tone Meister,

      I hear your dilemma on not wanting to enlarge holes... about the only thing I can find to fit is this, from AES:

      Can Capacitor, Multi-section, 20/20uF 450VDC, CE Manufacturing | Antique Electronic Supply

      I know it's only got 2 sections; you might be able to squeeze a discrete cap inside the amp... the diameter is only 1". Hope it helps? I guess if you factor in tolerancesnof the day, it's not THAT far off.

      Justin
      "Wow it's red! That doesn't look like the standard Marshall red. It's more like hooker lipstick/clown nose/poodle pecker red." - Chuck H. -
      "Of course that means playing **LOUD** , best but useless solution to modern sissy snowflake players." - J.M. Fahey -
      "All I ever managed to do with that amp was... kill small rodents within a 50 yard radius of my practice building." - Tone Meister -

      Comment


      • #4
        I know that many of the 1 3/8" diameter cans only need a 1" hole because of a lip around the bottom of the cap. They are built so that you can bend ground tabs inside the chassis for ground connections. Something to consider. In other words, just because the diameter of the cap is 3/8" larger doesn't mean you can't make it work in a 1" hole. You'll need to check datasheets and see what the lead/lug spacing is.

        Edit: As a for instance, if you look at the cap HERE- (then click to zoom), it appears that the ground lugs are spaced in from the edge of the can. It looks to me like a one inch hole would suffice, although you'd need to see a datasheet to be sure. This exact cap is available from several sources on the web.
        Last edited by The Dude; 02-04-2014, 04:04 AM.
        "I took a photo of my ohm meter... It didn't help." Enzo 8/20/22

        Comment


        • #5
          You might be able to remove the old can, hollow it out, and stuff it with new capacitors. Modern caps are much smaller. Since it is a 1" can it might take some finagling, like stacking them. But .... I haven't seen a can yet that I couldn't gut, stuff with modern caps soldered together and insulated with heat shrink tubing, then fill the void with silicon, hot glue, or 5 minute epoxy. Then it looks totally original if you take your time and have some skills. You can even use the original bottom plate. A Dremel tool and helps.

          Comment


          • #6
            If you must have a can cap:

            Check out Weber VST cap cans.
            They are 1.25" in diameter but claim 1" twist solder tabs.
            They come in various configurations.
            They are not cheap but may be what you are looking for.

            https://taweber.powweb.com/store/capord.htm

            SG

            Comment


            • #7
              Vibroworld used to make custom cans like this....I put one in my Silvertone 1484...but since Zack went out to tech for Robert Cray on a Clapton tour early in th last decade, he hasn't got Vibroworld back up and running and those custom cans aren't available anymore.

              I've used the Weber custom ones in the past, and you can even order them with separate grounding which can be useful for some amps. My complaint about the Weber custom ones is that they are glued to their base with cyanoacrylate aka Super Glue and the joint is small and precarious and is easy to disturb by bumping the cap. It is easy to fix but it should be redesigned to avoid this problem. Other than that issue, they work fine and provide flexibility where space is a problem and you need to use cans.

              If it was my amp, I would find a way to leave the can in place and use discrete caps inside the chassis, or stick a two section can in place of that one and use a discrete cap inside the chassis. Discrete caps are usually better quality, especially if you use radial caps, and they are also almost always cheaper, even with the added cost of adding terminal strips.

              Greg

              Comment


              • #8
                I just finished a restoration of one of these for a local guy. I left the original can in place to maintain its looks. Just removed the wires from it and fitted individaul 47uF, 22uF and 22uF under the chassis. As Enzo said "plenty of room".
                This is "standard practice" for restorations.

                Cheers,
                Ian

                Comment


                • #9
                  By using separate caps you can often 'improve' where the 0V terminals go to, so as to achieve a better distributed star grounding scheme.

                  Comment


                  • #10
                    Lots of excellent feedback from those of you with a great deal of experience with these things. This amp belongs to a local studio engineer/producer and he has initially chosen to try to make one of the CE Dist cap cans work--we ordered the 20/10/10/10 version and a new wafer.

                    If we can't get it tucked in there to his satisfaction, then I'll go with discrete caps on a terminal strip.

                    Gingertube: I was warned strongly against using more than 10 uF on the screens in this particular amp because the extra capacitance would cause the amp to "eat tubes." If your Supro was a 1624, perhaps you should verify for yourself that 22 uF isn't too much filtering for its screens.

                    trobbins: Would you elaborate on "improving" the 0V star grounding scheme?

                    Comment


                    • #11
                      Originally posted by olddawg View Post
                      You might be able to remove the old can, hollow it out, and stuff it with new capacitors. Modern caps are much smaller. Since it is a 1" can it might take some finagling, like stacking them. But .... I haven't seen a can yet that I couldn't gut, stuff with modern caps soldered together and insulated with heat shrink tubing, then fill the void with silicon, hot glue, or 5 minute epoxy. Then it looks totally original if you take your time and have some skills. You can even use the original bottom plate. A Dremel tool and helps.
                      I recommend doing it this way too. The capacity and rating of the original caps are very modest and modern caps will readily fit within an old can reliably and safely. The advantage nowadays is the increase in SMPS usage, which means more choice of smaller, high performance caps with low ESR. Some of the miniature low-profile radial or snap-in cans are tiny and hard to believe compared to their older cousins.

                      I generally make the assembly rigid enough to not need any filling or stuffing. If you do decide to do this then avoid silicone that releases acetic acid. I've had some corrosion problems on earlier rebuilds I did with regular sealant so no longer use it.

                      Unrolling the base lip can be tricky. I use a custom clamp in the lathe for each size of can and unroll the lip under low speed. After the can is hollowed out the lip gets annealed using the soap trick and heatsink to prevent the lettering getting damaged. It can then be re-formed easily to re-seal the cap assembly in the lathe and the finished item is identical in appearance to the original. For a one-off just using hand tools is fine - just takes a little longer.

                      There used to be a company called Frontier Electronics that did this a few years back. Don't know if they still trade.

                      Comment


                      • #12
                        yes modern discrete caps is the way to go, they are made in millions if not billions and QC is good, whereas recreated multi can caps are made in small numbers and I don't trust them at all. There's usually room underneath for a bit of tagstrip and some nice modern radial caps, just shave off the tags from the bottom of the old cap and leave it in situ and who's to know?

                        Comment


                        • #13
                          Perhaps google on distributed star grounding for some views - some people have prepared descriptive schematics as well, such as:
                          http://www.valvewizard.co.uk/Grounding.pdf
                          http://www.geofex.com/Article_Folder...ing%20amps.pdf

                          Some particular current loops are better kept to their own path, without using a common 0V section of wire, or star point, that is used by other circuitry. The most obvious current loop to look out for is the first major rectification capacitor.

                          Ciao, Tim

                          Comment


                          • #14
                            OK, here's the short version: This morning I installed a 20/20/10/10 @ 475 cap can from CE Distribution and within minutes 3 of the 4 sections had failed miserably. Both 20 uF sections let through more than 5 VAC ripple, and one of the 10 uF sections has nearly 1 VAC. I could literally smell the can as it disintegrated from within.

                            So ... I fitted a 20uF/475 and two 10uF/475 F&Ts and snugged them in there like they should have been there all along. After all, I distinctly remember telling Enzo that there was plenty of room in the chassis for discrete caps.

                            Anyway, the complete restoration consisted of just those three power supply caps, two 35/50 electrolytics, one 1k resistor, and one 0.02 polyester cap. The original RCA 12AX7s, dated 1962, tested like new and so did the original RCA 5Y3. We did install a fresh pair of 6973 power tubes.

                            I believe I am the only person to have ever turned a screw on this amp since it left the factory. It sounds great, with a floor noise so low I can barely hear it. I feel good knowing that not one single part was changed unnecessarily.

                            Comment


                            • #15
                              Glad you got it goin', TM. Bad news on the CE can, though. Doesn't make me want to exactly rush out and buy any.
                              "I took a photo of my ohm meter... It didn't help." Enzo 8/20/22

                              Comment

                              Working...
                              X