Ad Widget

Collapse

Announcement

Collapse
No announcement yet.

The making of an eyelet board...

Collapse
X
 
  • Filter
  • Time
  • Show
Clear All
new posts

  • #16
    Originally posted by J M Fahey View Post
    Congratulations

    The first "musical instrument amplifier dedicated" tool I bought back in 1969 was a bench eyelet press "to make boards like those on Fender amps" .
    It still works flawlessly 49 years later, have made thousands of boards , even used it for my early SS amps and even today use it regularly for quick projects such as speaker crossovers, simple supplies and such.
    It´s a twist type, similar to this one:

    Still saves my bacon often.
    Thanks JM!

    That's a cool vintage press.

    I've never worked with eyelets before and I'm finding lots of uses for them.
    If it ain't broke I'll fix it until it is...
    I have just enough knowledge to be dangerous...

    Comment


    • #17
      Of course.
      I only use aluminum for chassis and such, since I buy it by the sheet (in fact in 10 sheet packs, since I know I use it for everything), and cut/punch/bend as needed.
      But... aluminum can´t be soldered (in practical terms) so preferred assembly way is by riveting parts together.

      I use nickel plated 3.5mm (~1/8") by 7 to 9 mm (almost 3/8") hollow rivets/eyelets to assemble heat sinks, chassis reinforcements, double thickness areas for better heatsinking, the works.

      Plus repairing belts, etc.
      Juan Manuel Fahey

      Comment


      • #18
        Here's the schematic I made for this conversion.

        It's basically a mish-mash of the AB763 Deluxe Reverb effects channel minus the tremolo,
        and the Blues Junior from the Master Volume to the power tubes.
        Plus a few tweaks like the added Mid pot, etc.

        The stock BJ uses a 50k MV, I didn't have one, so used a 100k instead.

        Stock BJ transformers plus the replacement TX for the reverb.

        Click image for larger version

Name:	BLUES JUNIOR Conversion.jpg
Views:	1
Size:	279.8 KB
ID:	850041
        If it ain't broke I'll fix it until it is...
        I have just enough knowledge to be dangerous...

        Comment


        • #19
          Originally posted by galaxiex View Post
          Thanks!.... but full disclosure...

          There is quite a bit of wiring on the back of the eyelet board...

          [ATTACH=CONFIG]49555[/ATTACH]

          I thought to make the top side wiring less "busy"
          So what you see there is mostly power and grounds and a little bias wiring.

          I'm not sure if you're "supposed to" do this... or not...
          Never seen it done before so IDK.

          I'm sure this will come back to bite me in the a**....

          Indeed it already has...

          I mounted the eyelet board with spacers above the insulating card...
          and with the volume and bass turned up the eyelet card "buzzes" with the low E string.
          Had to shove some foam in there to stop the buzz.

          OR... a short or broken wire under there will cause no end of grief... I'm sure...
          In all my designs I never do under board wiring and I try to keep repair/remodel access in mind. Because Murphy says that if a problem does come up you're going to have to unsolder a bunch of crap and lift the board to fix it. And Murphy also says that in that long process you'll end up with a secondary problem that will mean doing it again. Nope. I'd rather have form follow function. To hell with pretty.
          "Take two placebos, works twice as well." Enzo

          "Now get off my lawn with your silicooties and boom-chucka speakers and computers masquerading as amplifiers" Justin Thomas

          "If you're not interested in opinions and the experience of others, why even start a thread?
          You can't just expect consent." Helmholtz

          Comment


          • #20
            Originally posted by Chuck H View Post
            In all my designs I never do under board wiring and I try to keep repair/remodel access in mind. Because Murphy says that if a problem does come up you're going to have to unsolder a bunch of crap and lift the board to fix it. And Murphy also says that in that long process you'll end up with a secondary problem that will mean doing it again. Nope. I'd rather have form follow function. To hell with pretty.
            I hear ya Chuck.

            I thought about all that when I made the decision to do this.
            In the end my desire for a "pretty" board won out.
            ...and it's not all that much "more pretty" anyway....

            First time it gives me trouble
            I'll probably snip off all the under board wires and put them on top.
            If it ain't broke I'll fix it until it is...
            I have just enough knowledge to be dangerous...

            Comment


            • #21
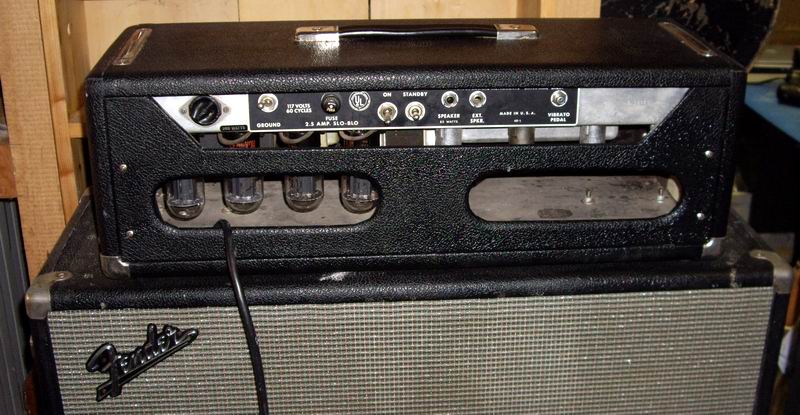
              Got started on a new back panel for this that allows access to the fuse, speaker jack and hum balance.
              Now waiting for some tolex to arrive.

              Click image for larger version

Name:	100_2452.jpg
Views:	1
Size:	823.9 KB
ID:	850045

              Click image for larger version

Name:	100_2453.jpg
Views:	1
Size:	846.6 KB
ID:	850046

              Click image for larger version

Name:	100_2454.jpg
Views:	1
Size:	814.9 KB
ID:	850047
              If it ain't broke I'll fix it until it is...
              I have just enough knowledge to be dangerous...

              Comment


              • #22
                ...and a little update on the schematic.

                I forgot to add the 2000pf cap on the grid of the reverb recovery tube.

                Moved some other stuff around to make it a little easier to read.

                Click image for larger version

Name:	BLUES JUNIOR Conversion.jpg
Views:	1
Size:	282.9 KB
ID:	850051
                If it ain't broke I'll fix it until it is...
                I have just enough knowledge to be dangerous...

                Comment


                • #23
                  So I've been playing this for a while now and like it very much.

                  Nice cleans and great crunch when cranked.
                  Tone controls very effective, can dial in whatever I want.
                  Honky mids to thick thunderous bass, great scooped sound, glassy treble, etc.

                  Sure couldn't do all that with the stock BJ.

                  The only minor issue is the reverb.
                  When cranked to "12" the reverb is on the edge of feedback, and waaaaay too much reverb.
                  I know I can just dial it down/not turn it up so much, but how would you go about taming this?
                  What component value changes would you look at making?

                  Thanks!

                  Edit; This seems to be a problem on almost anything I "build". Way over the top reverb, on amps that have it. SS or tube.
                  I don't actually design anything... I just kinda "paint by numbers" and copy existing schematics.
                  Sometimes, like this one, I mish-mash different circuits just to see....
                  If it ain't broke I'll fix it until it is...
                  I have just enough knowledge to be dangerous...

                  Comment


                  • #24
                    Click image for larger version

Name:	BLUES JUNIOR Conversion.jpg
Views:	5
Size:	304.2 KB
ID:	850064

                    Updated the schem with voltages...

                    I seem to always forget to do this, (add voltages to schem) for some weird reason, even tho I know it's kinda important. (insert embarrassed smiley here)
                    Last edited by galaxiex; 07-05-2018, 04:49 AM.
                    If it ain't broke I'll fix it until it is...
                    I have just enough knowledge to be dangerous...

                    Comment


                    • #25
                      A small update on this,

                      I removed C18, the 22uf bypass cap on the reverb recovery.

                      The reverb was waaaaaay over the top on this amp, bordering on feedback.

                      Pulling the cap tamed it to a reasonable level.
                      Before, reverb on 3 and it was lots, but nudge the knob and it became too much.
                      Now reverb on 4 and it's good, and much smoother increase with knob rotation.
                      If it ain't broke I'll fix it until it is...
                      I have just enough knowledge to be dangerous...

                      Comment


                      • #26
                        Originally posted by galaxiex View Post
                        A small update on this,

                        I removed C18, the 22uf bypass cap on the reverb recovery.

                        The reverb was waaaaaay over the top on this amp, bordering on feedback.

                        Pulling the cap tamed it to a reasonable level.
                        Before, reverb on 3 and it was lots, but nudge the knob and it became too much.
                        Now reverb on 4 and it's good, and much smoother increase with knob rotation.
                        I had a similar situation with the last reverb amp I did. Too much reverb. But really just too much in the LF. I could have trimmed the cap feeding the driver, but I liked the idea of bigger reverb tone so instead I changed the recovery triode cathode bypass cap from 22uf to .1uf. That did the trick. So if you think you might like a brighter reverb now that you've trimmed the level you can always partially bypass rather than leave your cathode unbypassed.
                        "Take two placebos, works twice as well." Enzo

                        "Now get off my lawn with your silicooties and boom-chucka speakers and computers masquerading as amplifiers" Justin Thomas

                        "If you're not interested in opinions and the experience of others, why even start a thread?
                        You can't just expect consent." Helmholtz

                        Comment


                        • #27
                          Thanks Chuck,

                          I never even thought to try a smaller cap there.

                          As is the reverb now sounds pretty good, but it won't hurt to experiment.
                          If it ain't broke I'll fix it until it is...
                          I have just enough knowledge to be dangerous...

                          Comment


                          • #28
                            Originally posted by galaxiex View Post
                            Got started on a new back panel for this that allows access to the fuse, speaker jack and hum balance.
                            Now waiting for some tolex to arrive.

                            [ATTACH=CONFIG]49576[/ATTACH]
                            Now you have a long relatively narrow strip of ¿MDF? as the bottom of your back speaker panel.

                            I would cut a long narrow strip of said material (maybe from the routed out oblong strip material), say 1 cm narrower on top and bottom so it´s invisible, 2 or 3 cm shorter at each end so it clears the mounting cleats, and glue it along the bottom strip for added strength, on the inside of course.
                            Click image for larger version

Name:	Galaxiex.jpg
Views:	1
Size:	201.8 KB
ID:	851329


                            Leo would have cut two smaller oblong holes instead, leaving center untouched for strength but you already cut, so ....

                            Juan Manuel Fahey

                            Comment


                            • #29
                              Originally posted by J M Fahey View Post
                              Now you have a long relatively narrow strip of ¿MDF? as the bottom of your back speaker panel.

                              I would cut a long narrow strip of said material (maybe from the routed out oblong strip material), say 1 cm narrower on top and bottom so it´s invisible, 2 or 3 cm shorter at each end so it clears the mounting cleats, and glue it along the bottom strip for added strength, on the inside of course.

                              Leo would have cut two smaller oblong holes instead, leaving center untouched for strength but you already cut, so ....
                              Good catch. Don't need that long, thin panel flapping around. Another option might be to square the back panel at the top line of the peek a boo and then install a piece of channel aluminum as the tube protection. Since the tubes are all rowed close to the back it seconds as a heat sink. I think Mesa did this with one of their models and I always thought it was a good idea. Doesn't look very retro though.

                              EDIT: Here's an image.

                              Attached Files
                              "Take two placebos, works twice as well." Enzo

                              "Now get off my lawn with your silicooties and boom-chucka speakers and computers masquerading as amplifiers" Justin Thomas

                              "If you're not interested in opinions and the experience of others, why even start a thread?
                              You can't just expect consent." Helmholtz

                              Comment


                              • #30
                                Originally posted by J M Fahey View Post
                                Congratulations

                                The first "musical instrument amplifier dedicated" tool I bought back in 1969 was a bench eyelet press "to make boards like those on Fender amps" .
                                It still works flawlessly 49 years later, have made thousands of boards , even used it for my early SS amps and even today use it regularly for quick projects such as speaker crossovers, simple supplies and such.
                                It´s a twist type, similar to this one:

                                Still saves my bacon often.
                                “Thumbs up”
                                If I have a 50% chance of guessing the right answer, I guess wrong 80% of the time.

                                Comment

                                Working...
                                X