Ad Widget

Collapse

Announcement

Collapse
No announcement yet.

gear damaged during fire.....

Collapse
X
 
  • Filter
  • Time
  • Show
Clear All
new posts

  • #16
    The only two amps I know of that use the plastic side panels were the Bassman 135 and the Bassman 70.
    The panels are hard to come by. I repaired a few using small pieces of black plastic and Gorilla Glue with sanding/filing.
    Another slow, labor intensive task. You could use 1/4 inch plywood and just make covers that screw on, similar to the plastic panels.
    The Bassman 135 will throw some heat from the power tubes when cranked up.
    The 135 head box was shorter in height than the Bassman 50/100; I think that is why they added the side vents for cooling.
    I suppose that if you make the panels, you could add a small fan to the panel that plugs into the outlet on the back on the amp.
    Comment


    • #17
      Originally posted by TigerAmps View Post
      The Bassman 135 will throw some heat from the power tubes when cranked up.
      The 135 head box was shorter in height than the Bassman 50/100; I think that is why they added the side vents for cooling.
      I suppose that if you make the panels, you could add a small fan to the panel that plugs into the outlet on the back on the amp.
      Fan's a good idea. I have a Bassman 135 chassis only, one of these days I'll have the local box shop put together a cab for it. I was going to omit the side vent panels. IMHO they contribute little or nothing to tube ventilation. But a fan, yeh that's something useful, I expect for the PT as much as the tubes. Even easier: a taller box, maybe with vents or fan on the 'floor'.
      This isn't the future I signed up for.

      Comment


      • #18
        Bassman 135 cleanup – day one

        With work and other responsibilities, my plan is to spend one hour every evening on the amp. Each night I will pull one item, or type of items from the amp, clean those items, bag ‘em, label them and call it a night.

        Starting from the outside and working in, tonight was front panel control knobs night. Pulled all nine knobs without any trouble. Searched through the house and didn’t find any appropriate cleansers, but settled on these Lysol cleaning / disinfecting wipes. They cut through the greasy soot, but are gentle enough not to remove the white ink on the knobs or dull the glossy finish on the plastic.

        After a thorough wiped down / scrub, step 2 was to take a handful of Q-tips and a shot glass filled with alcohol (not that kind of alcohol…) and do a second pass on the center silver inlay, the numbers, the grooved ridges and the rear side of the knob (the hole were the shaft attaches.) Finally, a few seconds back with the Lysol wipe so that no alcohol remained on the knobs. Had toothpicks ready to scrape out each ridge but they came clean during wipe down.

        All nine knobs took almost exactly one hour while watching Rachel Maddow report on the primary election returns from Arizona, Utah, Idaho and somewhere else. Some of the white ink was already worn off before the fire. Some is now less bright due to soot, and some were worn away during cleaning effort. Any additional cleaning seems like it will do more damage to the white ink, so I’m stopping here.

        Tomorrow night – the plastic vent panels on the side of the head cabinet.

        Photos:

        the head after I pulled the knobs:
        Click image for larger version

Name:	pulled_knobs_crop.jpg
Views:	1
Size:	99.4 KB
ID:	841413

        knob before cleaning:
        Click image for larger version

Name:	knobs_2_crop.jpg
Views:	1
Size:	120.6 KB
ID:	841414

        knob after cleaning:
        Click image for larger version

Name:	clean_knobs_2_crop.jpg
Views:	1
Size:	68.7 KB
ID:	841415

        Comment


        • #19
          Looking Good! If the cabinet's not up to snuff mojotone makes cabinets. From the pictures, the Tolex doesn't look so bad. I would probably try a heat gun or hair dryer on the side vents. I'm sure you can get some made.

          Comment


          • #20
            Originally posted by Richard View Post
            Looking Good! If the cabinet's not up to snuff mojotone makes cabinets. From the pictures, the Tolex doesn't look so bad. I would probably try a heat gun or hair dryer on the side vents. I'm sure you can get some made.
            The pictures really don't show the tolex damage. It is like parts of the tolex are decomposing - nearly half of the tolex appears to be breaking down; probably from some nasty components of the smoke / soot. Naked wood seems like the path forward.

            Tonight I removed the vent panels and the plastic just crumbled to the floor as I removed each screw. I will probably use speaker grill material (metal) to replace the vent panels

            Click image for larger version

Name:	vent_panels_crop.JPG
Views:	1
Size:	90.4 KB
ID:	841428

            Comment


            • #21
              Originally posted by lexington125 View Post
              It is like parts of the tolex are decomposing - nearly half of the tolex appears to be breaking down; probably from some nasty components of the smoke / soot. Naked wood seems like the path forward.
              Just tell people that tolex is "torrefied." It's the "in thing" now for guitars, why not amps?

              I've been able to remove scroungy old tolex quick & easy with a belt sander. Best to use a scroungy old belt too, one on its last legs, rather than sacrifice a new one. Once you've zipped off tolex & glue remnants, fine sand with say 150 or 200 grit on an orbital or "mouse". I've finished bare wood heads with maple stain then several coats of urethane lacquer, they come out looking like they belong on stage with the local dead-head band. And yes, under the tolex you may find knots & blemishes, don't worry it's all part of the "look of real wood". Of course you can select another stain, even some bright color like green or blue for an unusual appearance that would be eye catching. For "back to black" might see if an auto body place will shoot your prize with heavy duty black cargo-area paint. A lot of PA gear is finished that way now. Get a scrape or ding? Spray a shot of black, nobody will know.
              This isn't the future I signed up for.

              Comment


              • #22
                Originally posted by Leo_Gnardo View Post
                Just tell people that tolex is "torrefied." It's the "in thing" now for guitars, why not amps?
                I actually had to look this up to see what the term meant. Interesting that a company as 'traditional' as CF Martin would be advertising this as an improvement to their new guitars. ("makes 'em just like the old ones....")

                Back in the real world....
                The crumbling vent panels have me sorta freaked out....if the vent panel plastic (and large sections of tolex) seem to have decomposed due to some components of the soot / smoke / heat, what other surprises are yet to come? How about the plastic strap handle? After I've invested a couple of hundred hours in refurbing the amp, will the handle let go and result in a 5ft drop to the concrete floor? I'm not too worried about the wood cabinet, glass tubes or the metal chassis and wiring but what about all of the resistors, capacitors and other misc components that are made out of a variety of materials? Do I need to have every small component tested?

                Comment


                • #23
                  You could replace the handle with a new one for safety purposes.
                  I would meter check the resistors and caps before I fire it up. I would also check the PT and OT with the meter as well.
                  If they look good with the meter, you could put a lower rated fuse in the amp when you fire it up.
                  Start in standby and check the basic voltages (bias, filament, plate); then power it up without the tubes installed to check the power supply for obvious defects.
                  When feeling brave, put the tubes in and throw the standby switch. If you have an old set of tubes, I would fire it up with 'em first.
                  It should hold without signal. Then, if no smoke, run some signal at low volume and see how it sounds.
                  It you heard and funny noises or cracking, the it would be time to isolate the problem stages and use freeze spray to find the bad components.
                  I tend to bounce back and forth between the cabinet work and the chassis electrical to keep my sanity.
                  It will definitely take some time; no other way.

                  Comment


                  • #24
                    Originally posted by lexington125 View Post
                    How about the plastic strap handle? After I've invested a couple of hundred hours in refurbing the amp, will the handle let go and result in a 5ft drop to the concrete floor?
                    Crikeys, if it's a worry, replace the ten buck handle. It coulda been worse!

                    If it's the correct handle there's a pair of steel strips inside the plastic. That's where the strength is. If it was just plastic, they'd all have broken long ago.

                    Tiger's advice is good too. Be happy you don't have an amp that was soaked with fire-quenching goop. I've had to deal with those: no fun zone.
                    This isn't the future I signed up for.

                    Comment


                    • #25
                      Originally posted by TigerAmps View Post
                      When feeling brave, put the tubes in and throw the standby switch. If you have an old set of tubes, I would fire it up with 'em first.
                      It should hold without signal. Then, if no smoke,...

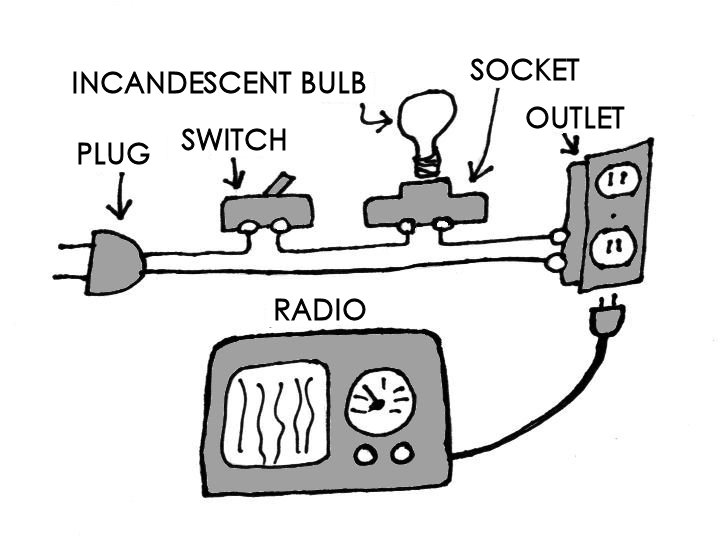
                      Powering Your Radio Safely With a Dim-bulb Tester
                      DON'T FEED THE TROLLS!

                      Comment


                      • #26
                        It you meter test properly, you should be more than 90% sure it will power up provided you use tubes you know are good.
                        If you fire it up in stages, high voltage and bias, then no tubes and filament, then pre-amp tubes only then all tubes
                        with a lower fast blow fuse you to the the same conclusion, but you find the obvious problems in stages and build confidence along the way.
                        It really is preference, but I find that a through meter test generally find most of the problems.
                        If the PT is shorted, you will find it either way (except it cost you a fuse).
                        I once had a filter cap that metered out fine, but was bad - it got extremely hot during power supply testing; yet it did not blow the fuse.
                        Not sure if the bulb tester would have shown anything either. The cap was in a 43 years old and they should have been replaced anyway.
                        Especially after the amp was exposed to an unknown (but significant) amount of heat, I would check the entire amp first.
                        It doesn't take that long to do and is always a good learning experience.

                        Many times in the forum you see "isolate the problem". This is sort of isolated sectional testing.
                        Once the bulb light up, you have to start isolating the problem(s) anyway; I am sort of saying approach it from the opposite direction.

                        Comment

                        Working...
                        X