Ad Widget

Collapse

Announcement

Collapse
No announcement yet.

Nightmare on a Boogie Board... pictures

Collapse
X
 
  • Filter
  • Time
  • Show
Clear All
new posts

  • Nightmare on a Boogie Board... pictures

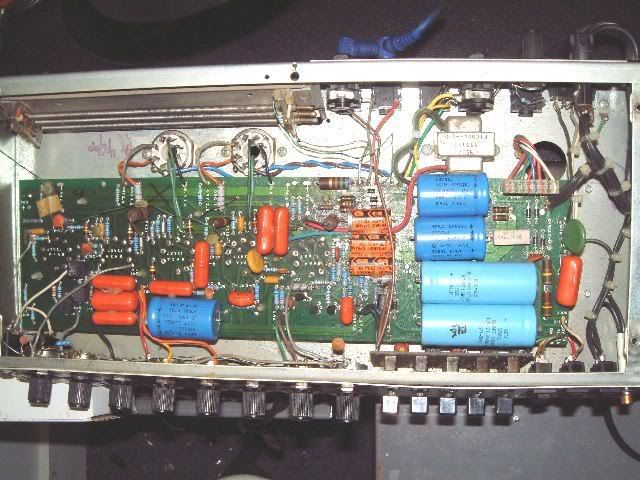
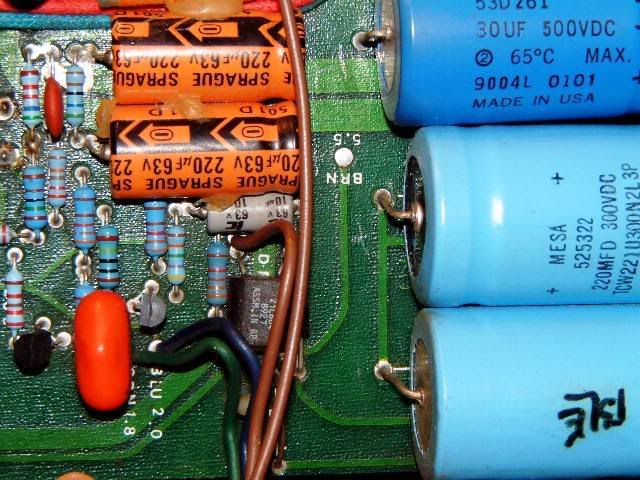
    I just installed a new OT on a Mesa .50 Caliber, 1990. My next project is to replace the electrolytics. The components are top mounted yet there seems to be solder on both sides of the board (more on the bottom). I can't get to the bottom without first removing 45 wires. I tried 650 degrees on my iron figuring I could heat up the lead of the cap and just lift it out....no dice. I'm sure there is an obvious solution without removing the board but this is my first board of this type. Previous boards have been so much easier to remove. Can I just snip the leads from the old caps and solder to that, or would that be shoddy work?

    thanks as always for the advice.

    Gary


  • #2
    Originally posted by Garydean View Post
    I can't get to the bottom without first removing 45 wires.
    Yikes!!!!

    Originally posted by Garydean View Post
    Can I just snip the leads from the old caps and solder to that, or would that be shoddy work?
    It wouldn't be the first time I've seen that done. Do what you've got to do.

    Comment


    • #3
      You don't need to take the whole board out, just take the wires off one side (the back looks best) so you can turn it over and get at the underside. Boards usually have to be half-removed in this way for repairs, you get used to it. Don't forget to mark the wires and holes up if you do it.

      It is ok to clip the leads and solder on to them if you crimp the new ones on well ("solder is not glue") but obviously it's not the best way. There's a danger of melting the joints on the board as you work and loosening them, and the components might be a bit less secure. And it looks ugly. But I do it sometimes for customers in a hurry. If you hold down the electros with a bit of hot melt or silicon it will help; that's normal practice, as you'll discover as you take the old ones off. But I don't think I'd feel happy about doing all those caps that way. Maybe I'm anal.

      Boogies are 'plated through', the copper goes right through the hole to the other side and the solder is on both sides. It can be quite a nuisance to get the holes clean because of this - another argument for clipping the leads and crimp-and-soldering the new parts on I guess.

      It won't help you to hear this, but these Caliber models are amongst the easiest Boogies to work on. They only have one main board, and it isn't too big for the chassis... I'm a fan of these amps, I think they sound good and are not overcomplicated.

      Worth checking all the big power resistors on these, values and joint integrity. They get hot.
      Last edited by Alex R; 11-09-2007, 10:17 PM.

      Comment


      • #4
        Thanks for the advice and tips. I'm gonna dig in tonight and tip the board.

        Thanks again,
        G-

        Comment


        • #5
          When I do cap jobs on Boogies I always clip the old leads,I can then put a heat sink on the lead connected to the board and not worry about overheating and loosening the lead attached to the board.I have a deep hatred for PCB's by the way.

          Comment


          • #6
            Were I to take that board out, I'd pull the knobs off the pots, remove the nuts from the pots, remove the jack nuts, unsolder the wires from the two switches on the right by the power switch, and most likely demount the graphic assembly. Let all that crap hang by its wires and flip the board and dnagling parts up and over onto its back over the reverb thingie. Now I have access to the underside.

            If i were just replacing a few components I might not bother though. Rather than try to remove the old part whole, snip off the wires right at the part's body. Now there are two bare wires sticking up. You COULD splice a new part onto those wires, and electrically it would work fine, and the clip as heatsink method of preventing the splice solder from melting the board solder works, but when I see work like that in an amp, I think hack.

            Snip off the old part, then grab the top end of the free wire and heat the solder where it meets the board. Pull the wire end out when the solder melts.. Now clear the empty but solder filled hole.

            Form the leads on the new part to fit the hole spacing. Trim them to length so that when in the holes, the wire leads will only project a little past the far end of the hole, so they don't wind up touching something under there.

            Now solder from the top of the board. Heat and apply enough solder that you know it flows through. There you go, nice professional work without removing the board.

            Here is a tip on clearing the holes. The empty holes are usually half filled with solder, and used solder at that. To clear the hole, the iron has to melt the solder all the way through. And that isn't easiest when old solder only half fills the hole. I find it easier if I melt new solder into the hole - nice fresh solder filling the hole - resolder the hole as it were. Now the iron will find it easier to melt the hole full of solder throughout for suction removal.

            I use a desoldering station mostly, but if you cannot seem to justify spending a few hundred dollars for a desoldering station to get your cap job done, then use a sucker with your regular iron. I like the metal tubular cock it and press the button type. Cheap and effective and a strong suction pulse. The plastic ones like SOldapult work OK too. I HATE the squeezy bulb ones, the motion is not as simple as pressing the button (which matters because you have to keep the bulb tip on the work along with the iron as you release the squeeze), and the vacuum pulse is a LOT weaker than the spring loaded ones.

            A lot of guys swear by braid, but I don't like it. It requires more room to work than a tool, and you have to apply enough heat to it to not only melt the solder in the work, but also heat the braid up to solder melt temps. And it relies on capillary action to draw solder up, which is less effective in my view than a strong vacuum pulse.
            Education is what you're left with after you have forgotten what you have learned.

            Comment


            • #7
              Well...... I dove in last night and it wasn't so bad. I heated from the underside with fresh solder on the tip and the parts came right out. That is after I carefully sliced the glue away from the under side of the caps with a razor. I ended up drawing a wiring layout as well as snapping a few photos. I was amazed how long I could stand on my head as the board could not fully flip over. Thanks for all the advice.

              BTW,
              I decided to remove the wires from the back of the chassis and tilt it towards the front.... it was a coin toss decision, plus I wanted to stay clear of the reverb area.

              Gary

              Comment


              • #8
                Whatever works.

                You found out that "Just do it" is a pretty good slogan.
                Education is what you're left with after you have forgotten what you have learned.

                Comment


                • #9
                  Great slogan!! hahaha. I'll stay clear of a SS, Sunn Coliseum for a few years. That thread blew my mind. Now I know what not to ask for, for Christmas..lol

                  Comment


                  • #10
                    To each his own. Myself, I'd much rather work on that roomy old Sunn than the cramped Mesa board.
                    Education is what you're left with after you have forgotten what you have learned.

                    Comment


                    • #11
                      Well, after a few hours of careful and patient attention, the new OT and the new caps sound great. It wasn't the nightmare I anticipated so I do really appreciate the encouragement and support from this forum.

                      Gary

                      Comment

                      Working...
                      X