Ad Widget

Collapse

Announcement

Collapse
No announcement yet.

Testing My MJ15003 Transistors

Collapse
X
 
  • Filter
  • Time
  • Show
Clear All
new posts

  • Testing My MJ15003 Transistors

    MEF Members -

    I'll be working on a project soon (rebuilding an Acoustic Control 150 Guitar Head) and planning to replace four RCA 4815 NPN Output Transistors. I take it this transistor is a spin off of the 2N3055.

    In my collection of transistors, I have two batches of MJ15003. I must have bought them at different times and from different vendors.

    The Spec Sheet from ON Semiconductor MJ15003 shows the gain (hfe) at 25 minimum and 150 maximum.

    For my testing, I am using the Atlas DCA Pro Semiconductor Analyzer.

    Batch 1 of MJ15003G (On Semiconductor) shows a number below that as BM1244 . This bunch of transistors has hfe from 65 to 84.

    Batch 2 of MJ15003 (Motorola) has the number 9917. A few of these have hfe @ 12 and others are at 30 and one in the group is 66.

    Since I need 4 transistors, I guess I will use the ones from Batch 1.

    But I am surprised to see such a wide range of readings - especially in Batch 2.

    Anyway.... the question..... I know you have all recommended to use transistors of the same kind. But when I see the differences between the Motorola and the ON, I take it you would not mix brands - even though they are MJ15003s. But what about matching hfe. Would you be concerned with that?

    By the way... I have 5 transistors in Batch 2 that measure under 20. Keep em? Toss em? You think that might be fakes?

    Thanks!!
    It's not just an amp, it's an adventure!

  • #2
    ON Semi and Motorola ARE the same brand. Motorola spun off its component division, which changed its name to ON Semi.

    The gain of those transistors is being measured by your hand meter. What matters in circuit is gain at performance levels. I don;t worry about meter readings. In fact I suspect the data sheet already has a gain vs current graph.

    A lot of Peavey power semiconductors are Motorola types but wear a PV part number. The part number itself is made from a current and voltage number. For example the 70483180, which is a MJ15024, is this: 704 means transistor, 8 means NPN, 3 means the current at which gain is specified, and 180 is the voltage. The data sheet calls it a 250v 16A part.

    SO when you drag a couple amps through the transistors, I think your gains will even out close enough. Plus the inevitable ballast resistors - those 0.22 ohm or 0.47 ohm resistors or whatever - also serve to even out currents.
    Education is what you're left with after you have forgotten what you have learned.

    Comment


    • #3
      Thanks Enzo...

      So it looks like I will use my ON Semiconductor batch - and there are four of them.

      And yes, I will measure the .5 ohm ballast resistors that hang off the emitters.
      It's not just an amp, it's an adventure!

      Comment


      • #4
        ON Semiconductor replaced Motorola in 1999.

        Not impossible but statistically unlikely you bought "just" the very last transistors rolling out from that production line and still labelled "Motorola"

        IF I were a semiconductor faker , using a data code >1999 would instantly discredit them (that said, now and then you find "Motorola" labelled ones with codes such as 2004 , 2006 , etc.) so no matter when made (faked cough cough) I would apply a 1999 code ... tops.

        Polida is a semiconductor supplier FAMOUS for selling fakes (just search DIY Audio for complaints), yet they have 99.3% positive EBay rating and over 166000 sales

        They offer 2000 code "Genuine Motorola"


        So your "on the brink" date code plus appalling measurements strongly hint as fakes to be avoided.

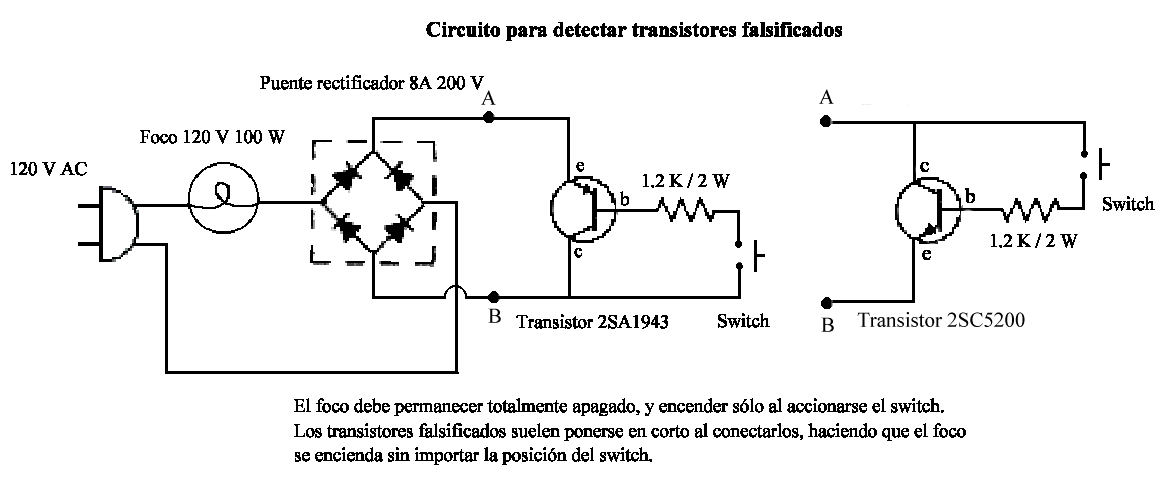
        A user was so sick about fake transistors he created this "swim or drown" tester, go figure.

        And he was *happy* at blowing half his power transistor stash ... as long as it explodes on his bench instead of inside a repaired and delivered CustomerŽs amplifier, nuking other parts, expensive speakers and his own trustability in one single blow.


        Circuit applies 160V peak, average current 1 A and short 1 second current burst of 5 o 6A (cold filament) so well within "official" ratings.

        Transistor is greased and mounted on heat sink, no mica needed, but be aware circuit is live voltage.

        True transistors turn lamp on/off using the temporary ON switch, fake ones turn lamp ON ... and it stays ON forever.
        Juan Manuel Fahey

        Comment


        • #5
          Excellent info... thank you Juan.

          I try to avoid buying parts from eBay. I would need to see if I kept a receipt for Batch 2. I know that I bought some transistors from Mouser and Antique Supply.

          And if I have some spare time, I might build that tester!!

          Tom
          It's not just an amp, it's an adventure!

          Comment


          • #6
            Yes. Thank you Juan......excellent info....
            Cheers

            Comment


            • #7
              One big problem with second breakdown measurement is that itŽs a negative resistance area, as soon as current starts rising, voltage across the junction drops, so current increases even more ... and so on and on.

              ThatŽs why it quickly becomes uncontrolled and destructive.

              Many measure transistor breakdown voltage by applying very high voltage (say 300V) through a high value series resistor (say 100k) and measuring voltage drop.

              Problem is that significantly increasing current will significantly decrease said voltage, until a minimum is reached and then it starts increasing again.

              The point being that a single measurement does not tell the full pictuire, by far.

              I remember just from memory, the circuit used by RCA in the late 60Žs , it was featured in one of their "Power Semiconductor" books, to fully and safely measure and *show* second breakdown on a scope screen, it became a dedicated curve tracer.

              Just from memory, canŽt find the book , it involved a socket for the transistor, a voltage supply of reasonable value (say 30 to 40V DC) , an inductor and a repetitive ON-OFF switch .

              Funny thing is that it was not electronic but electromechanical, used what was basically a record player turntable with a magnet attached to an edge, triggering a reed switch/relay so it turned ON briefly and then OFF for the rest of the revolutionh.

              Very low duty cycle, I guess 5% or less.

              As soon as contacts opened, voltage started rising in the inductor (same as in a car ignition coil) a lot, it woukd reach way over 300V if left on its own, BUT said voltage was clamped by the transistor under test, and current sewpt down to 0.

              They applied voltage to scope V input, current to H input, and curve showed V/I curve under breakdown conditions.

              And since it was repetitive, you had a somewhat jittery but stable scope image , actual second breakdown was clearly visible as a kink in the curve, no way to mistake it.

              So those very clever RCA Engineers could safely measure a deadly phenomenon, and keep it on screen before digital scopes were even invented.

              And it was not destructive because even if once triggered it was "unstoppable" (transistor would pass increasing current even if base current was stopped) .... total energy stored in the inductor was not enough to destroy the junction.

              Clever chaps indeed.

              IF somebody finds that book (it was edited around Ž67 to Ž69) , maybe he can search it and find (and post) that schematic.

              It would be interesting to build that test jig and test modern transistors ... at least to separate fake from good.

              EDIT: I found this 1966 IIEE Conference/Paper describing exactly this, but I canŽt download it, maybe somebody is (or knows) an IIEE Member who can do us a favour?

              https://ieeexplore.ieee.org/document/4207736

              link includes this tantalizing thumbnail, but paper must include full procedure:

              Last edited by J M Fahey; 04-13-2019, 06:05 PM.
              Juan Manuel Fahey

              Comment


              • #8
                Originally posted by J M Fahey View Post
                ...maybe somebody is (or knows) an IIEE Member who can do us a favour?
                https://ieeexplore.ieee.org/document/4207736
                I can't seem to upload it to the forum, but I'll keep this link live for a bit.

                https://drive.google.com/file/d/1kPV...ew?usp=sharing
                “If you have integrity, nothing else matters. If you don't have integrity, nothing else matters.”
                -Alan K. Simpson, U.S. Senator, Wyoming, 1979-97

                Hofstadter's Law: It always takes longer than you expect, even when you take into account Hofstadter's Law.

                https://sites.google.com/site/stringsandfrets/

                Comment


                • #9
                  Thanks a lot.
                  I downloaded and reprinted it with CutePDF which in theory "should" remove any constraints it might have, also reduce size by splitting it in 3 ... no way, CutePDF Writer prints pages 1-7 , 8-14 or 15-20 and creates files *larger* than the full original one ... WTF?
                  All larger than Forum accepted size.

                  Will retry later with other parameters In any case, I am keeping a copy; IF somebody needs it he can PM me.

                  This is the full IIEE level paper, very interesting but not much detail on the practical measurement, besides the basic circuit ans 2 screen captures; IŽll keep searching for the RCA book which explained the practical test.

                  In fact, I DO have that book ... "somewhere"

                  Oh well.

                  PS:
                  I printed the two relevant pages (16 and 17) :
                  Attached Files
                  Juan Manuel Fahey

                  Comment


                  • #10
                    Here is an On Semi app note that suggests the inductive test circuit and has a good description of the second breakdown process.

                    ON Semi AN1628-D.PDF
                    Experience is something you get, just after you really needed it.

                    Comment


                    • #11
                      Excellent. Thanks.
                      Juan Manuel Fahey

                      Comment


                      • #12
                        I remember that RCA Test Circuit, though have long since been seperated from the engineering file that had all the construction notes and details that went into that test fixture Brian Wachner had built for testing RCA 2N3773's and 2N6259's for the very early BGW Systems Power Amps. One of my first jobs in engiineering was going thru the pallets of new parts, and screening them for the ones that ranked higher breakdown. Those went into the first power amps that were used to drive the Cerwin Vega Corner Horns & Folded Horns used in theaters for the movie Earthquake in 1974.
                        Logic is an organized way of going wrong with confidence

                        Comment

                        Working...
                        X