 Tweet
Tweet
I picked up a "better" Reed switch. Encased in plastic. It seems to have fixed the problem, the calculator counts so fast that the numbers sometimes dissapear for a second, but it has stopped lagging on a particular number. Ive planned out for the limit stops, and will start "fabricating" them over the weekend. Almost there....
-
-
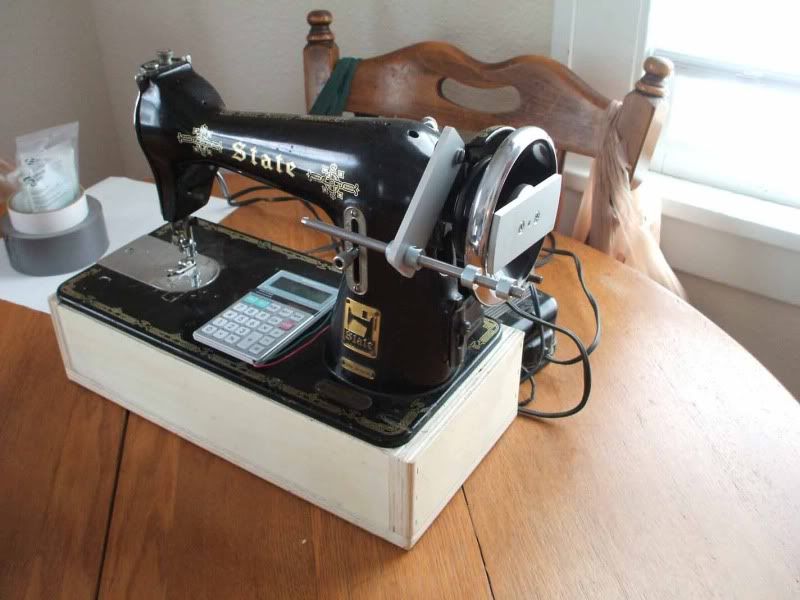
Ok...On the home stretch! I got most of the limit stop bracket complete....need to install stop collars to hold bracket at 90 degrees, and 2 more to provide the limit stops..... Bar spacing from the handwheel is 1 inch.
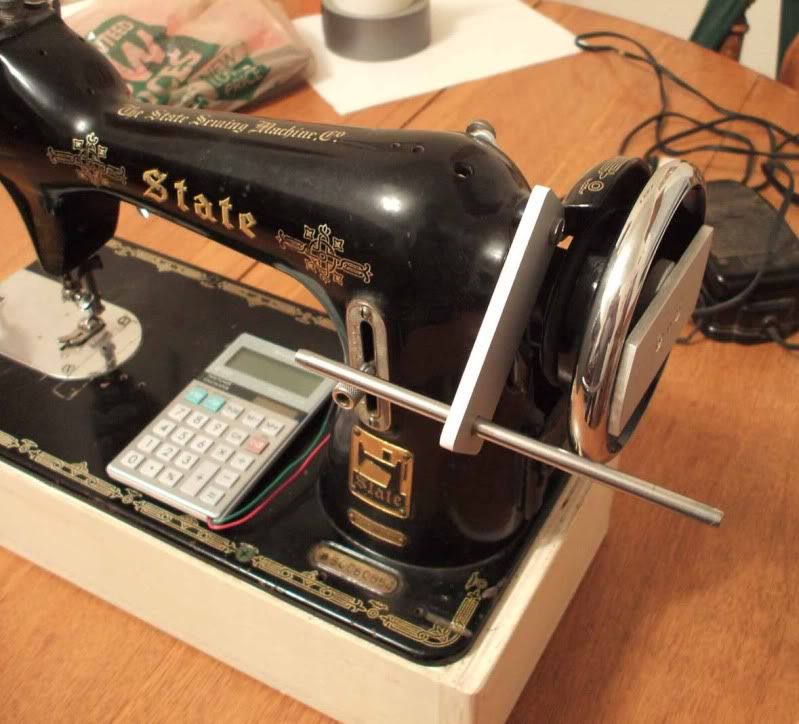
New reed switch and bracket.....Counter now works flawlessly!
Comment
-
completed winder with adjustable limit stops...Total cost? $27 (I had the aluminum/wood/calculator around the shop) I think this could easily be done from scratch for about $50. Thanks to all who helped!
Comment
-
I had a very simmilar machine that I picked for 10 dollars. I think it was from around 1920. I re wired it and the motor was fried. I did pull a lot of neat and useful parts off it though. Everything on that machine was stainless and engineered to never wear out or break down. Except the motor of course. Well done Lex! That machine looks very Jules Vernesque. Did I just coin Vernesque?Comment
-
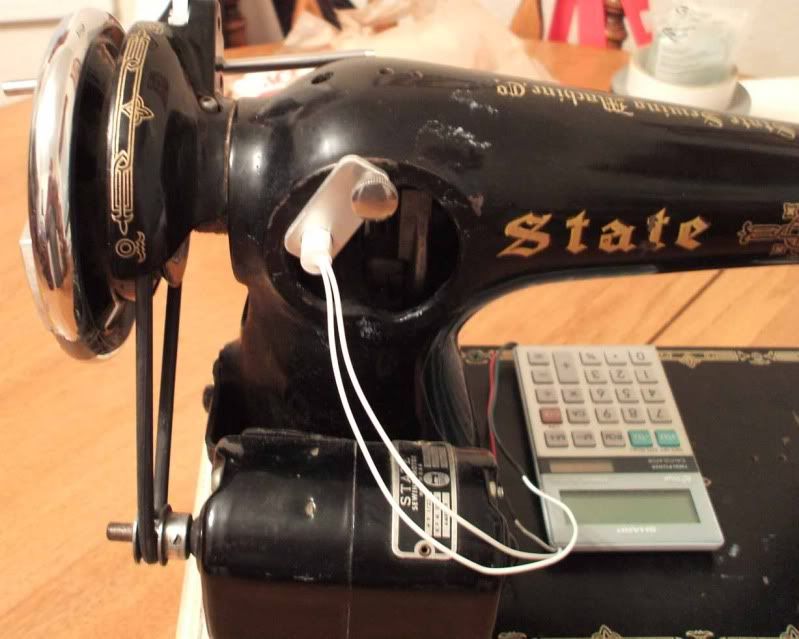
Thanks Mondo! I got pretty lucky that the motor is pretty universal, and I think I could pick up another machine and rework the bracket/motor mount fairly quickly. Just about everything on this is either forged steel or cast iron! Hopefully the good photos will inspire/help others starting out. I used a bandsaw to cut all the aluminum. I dont recommend this unless you have money to throw at new blades, and give the machine a serious cleaning after cutting the aluminum. But one could cut them with a hacksaw. The only other tools I used were a hand drill and a sander. I also tried to get a good photo of the reed sensor, since there has been alot of question about which type works the best.....Now to save up for the spool of wire...Comment
-
I'm currently building a couple of winders to see which I like and which has the best results. The old sewing machine is toast but I pulled off an interesting little cam with a 200 tooth gear that has a smaller heart shaped plate mounted on it. I have no clue as to what it's original use was but I can use it as a primitive counter if I can get a small enough belt to connect to the motor I plan on using. I found an old BT7 6 amp Singer Motor with a footswitch at a local thrift store for 15 bones. I bolted the motor to an offcut piece of 6"X6" lumber that I painted black. Voila! My first winder.
Another project I have going is an old Thor shoe buffer that looks very cool. The motor is way too fast at 3000 rpm so I'm going to intall a variable speed control once I figure out what type of motor it is. The shoe buffer has a left and a right spindle like a schatten winder so it will be good for RWRP and bucker coils. My last project is a small wood lathe made by Mastercraft. It has variable speed and should make a nice sturdy tailstock winder but it is on the big side. A friend of mine is going to loan me his Schatten machine for a while so I can compare all 4 once things get rolling. My main setback is my counter. I bought a little chinese LED counter for 20 bucks delivered but it only counts in seconds. It doesn't seem to add or subtract. The ad said it could be used as a counter but I can't get the bloody thing to do anything useful other than make a fake timebomb. I've tried every possible combination of circuits. It also came without any back so the PCB is exposed unless I build a case for it or rout out my machine. The proximity indicator nib I ordered needs an amplifier I think. It doesn't seem to generate a pulse when I pass a magnet by it. I got a reed switch for one penny on ebay plus shipping and it should work better than the 20 dollar proximity indicator I have. I'm just having a gas making these old pieces of archaic detritus into useful machines again. Any tips would be appreciated. I'll send pics once I find my camera.Comment
-
Check out the reed switch in my latest photos...If you have an electronics supply place near you, the reed switch I got was about 3/8ths around, and 1/2 inch long. Make sure it is the round type! I tried the glass type with no casing, and it bounced the circuit alot. The calculator trick is cheap and easy, and looks like most folks using it, have had it keep up to about between 700-1200rpms!?! Id like to see some photos of what you have going.... =) If you have any questions about my winder, just give a shout!
-E.Comment
-
Hi Erin, thanks for all the helpful information! It's been really great. So, I was trying to see what kind of sensor you were using, and you mentioned that it was a round reed sensor used on doors usually???? So, is it something like this? Amazon.com: Short Round Magnetic Contacts: Home Improvement My other question is, do you use the supplied contact or use a piece of metal or magnet of your own. Thanks in advance!!Originally posted by lexluthier72 View PostComment
-
John....Thats EXACTLY the one! I used a 3/8ths round rare earth magnet simply stuck to the main spindle that runs the length of the top arm of the machine. For safety I might glue it in place with some silicone, so it doesnt fly off....I have not wound anything with it yet, and am patiently waiting another paycheck/after the holidays to order a spool of wire....I will be reporting how it holds up under my first wind... Glad I could help....I keep seeing alot of folks in the same spot i was in, with not enough information, and thought I could help out alot of folks, by showing it can be done with a minimum of tools.
I should mention, I removed an "arm" on the spindle to locate the magnet. If you find a machine similar, you'll notice under the rear cover (round opening on the back) there is an arm that goes straight down from that spot...remove the arm (controls the sewing machines "bobbin plate" under the needle. where you removed the arm, thats where Id place the magnet. Good luck.Comment
-
Ok....so....I have a potential problem, that Im not sure how to solve. The "handwheel" rotates counter clockwise toward the limit stop bar. This will make the wire wind down against the limit stop bar. I assume most winders rotate clockwise, pulling the wire up over the bobbin, rather than under it. Will it be any problem with snags, wire breakage, tracking, etc....? Should I extend my "platform" and mount the motor the other direction? Ive not started winding, but am wondering if anyone else got thier sewing machine winder together and how they've dealt with this....
-ErinComment
-
-
Got it. doh. Makes total sense. Thanks Red.Comment
-
I had the same thing happen to me actually. I got the machine home and was so excited and then realized that it didn't go the direction that i wanted it to. So, i just took it apart and built a machine with the motor instead. Thankfully the machine also had this perfectly machined, 1/2" stainless steel drive shaft that was about 12" long and worked perfectly. i can post pics of it now that I'm done. It's kinda like the Schatten in that it has a small footprint and has a plate on both sides, but mine has a wood frame rather than metal. I was able to use a few parts from the sewing machine so it definitely wasn't in vain, just had to do some leg work and buy a few parts at the hardware stre.Comment
-
john....good to know. I think photos of your machine would be good for this thread. I did figure out how to solve the problem....Thanks to RedHouse. I also opened up the motor, and with little work, one could reverse the brush wiring, and reverse the direction.
-ErinComment
-
I've attached a couple of pictures here for you here. In the top view pic you'll see the drive shaft itself. The sewing machine I got it from had the friction type motor because it wasn't quite old enough. However, I was very lucky to get this perfectly machined drive shaft that is straight as an arrow. Pretty amazing! So, then I bought a second sewing machine so I would have the right kind of motor. I was going to use the pulley attached to the sewing machine wheel, but it wasn't quite balanced enough for me and caused a little bit of shaking. Being a perfectionist, I couldn't handle it, so I went to my local branch of Grainger Industrial supply and picked up a pulley wheel with a set screw and it fixed the problem straight away. So, if you don't count the parts that I had to not use (I was learning!!), I suppose it was probably around $60 for all the parts to do this. It was lots of fun and a great adventure of creating something with a need for this kind of precision.
I was also able to utilize the pedal and the power outlet that came with the older sewing machine and made things really easy. I then put a screw through the top of the pedal to control the speed because the RPM can get upwards of 3000! It really cooks. Let me know if you have any questions!!
Oh, Erin, how is the magnetic reed switch working? I've been curious about how fast you can get the speed up before it starts to become inaccurate. Does having the really strong magnet help quite a bit?Attached FilesComment
-
Comment