Announcement

Collapse
No announcement yet.

Mini Vacuum Table

Collapse
X
 
  • Filter
  • Time
  • Show
Clear All
new posts

  • #61
    Jason's mini vacuum table attempt

    Ok, so here goes...

    Let me say right off the bat: I realize that this is a pretty lo-fi setup, and I'm pretty sure that my heating method is the problem I'm having achieving a crisply formed shape.

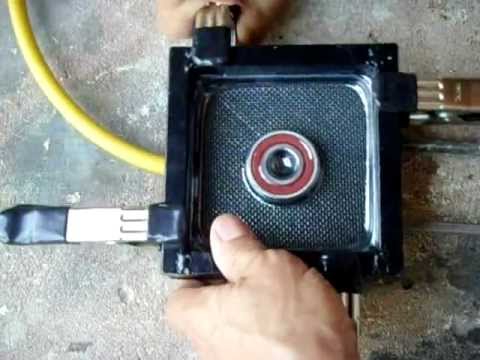
    I built a vacuum table, and a little "oven" of sorts. It's basically a convection oven, with the heat supplied by a Porter Cable heat gun.
    Click image for larger version

Name:	IMG_1662.red.jpg
Views:	1
Size:	257.3 KB
ID:	836186

    A little lid goes on the top, to prevent the top side of the plastic from cooling too fast.
    Click image for larger version

Name:	IMG_1665.red.jpg
Views:	1
Size:	261.7 KB
ID:	836187

    This picture was taken before I purchased the plastic. The white sheet is just paper, as a mock-up. The "pickup" mold is also just for testing. It's a 1" wide x 4" long x 1/2" tall piece of poplar.
    Click image for larger version

Name:	IMG_1666.red.jpg
Views:	1
Size:	190.2 KB
ID:	836188

    And here are four unsuccessful test runs with 1/16" ABS.
    Click image for larger version

Name:	IMG_1681.red.jpg
Views:	1
Size:	249.3 KB
ID:	836189

    Each one got a little better, and a fifth (not pictured) was the best. This last one was heated on both sides (flipped over on the oven), stuck on the table to suck down, then hit with more heat until sides pulled in. Alas, I was a little too eager, and lingered too long with the heat gun, resulting in a bubble and some blistering.

    I'm liking the textured side of the ABS, as it hides imperfections. The 1/4 sheet I bought was $14.80 at TAP Plastics: cut into sixteen 8" squares, that's about $.93 per square.

    Again, even heating is likely my biggest issue. I won't be sticking this plastic in the kitchen oven, though, as it is NOT a pleasant smell (and my wife would strongly disapprove). The little "oven" or chimney I built was made out of found materials, so no big loss if I end up tossing it and buying a toaster oven at Goodwill.

    Whaddaya think, lads?

    Comment


    • #62
      My suggestion is to try combining the two operations. Your problems are probably mostly due to the plastic cooling too quickly between the heating and the vacuum forming. In particular, the air flow of the vacuum pull is going to quickly cool the areas of plastic that need most to flow.

      Try inverting your heating unit and putting it up on top of the vacuum table. Or maybe the other way around? The idea is to try to hold an even, controlled temperature inside the chimney, and to hold that mass of hot air against the top surface of the plastic the whole time that the vacuum is pulling it over the mold.

      Also, use that same rig, without the plastic holding frame in place, to pre-heat the vacuum table surface and the mold (without the vacuum on).

      Pre-heat the rig, watching a thermometer in the chimney. Then insert the plastic-holding frame, let it heat soak for a moment, then start the vacuum. Keep the heat applied and watch the progress. The trick will be making some kind of a window so you can watch to know when it's done forming.

      I haven't done any vacuum forming myself; I'm just offering ideas from my industrial machine design background.

      Comment


      • #63
        Saaaay, that's some good advice, Bruce! So, let me see if I have this right...
        - Heat the plastic in my "oven" as I've been doing.
        - Heat the mold and table deck.
        - Place the heated plastic over the warmed mold, and grab the heat gun to apply more heat.
        - Turn on the vacuum when it seems like everything is ready to pull down, and continue to apply more heat as needed.

        Something like that?

        Comment


        • #64
          Here's what I'm suggesting:

          1.) Place the oven over the mold and vacuum table. Vacuum off, plastic frame set off to the side. Use your heat gun to heat up the mass of air inside the oven, watching it with a thermometer. The mold and vacuum table surface will also come up to about the same temp.

          2.) When the temperature reaches the right point, quickly lift or open the oven and insert the plastic-holding frame between the oven and vacuum table. Vacuum still off, still holding temp in the oven. The plastic sheet will be seeing heat from above and below.

          3.) Let it heat soak for a moment, until you can see the plastic starting to drape, by gravity, over the mold.

          4.) Start the vacuum, while still keeping the oven heat on the plastic from above. Watch it pull down over the mold

          The key thing is that you are maintaining the temperature of the chamber above the mold the whole time that the vacuum is doing its job. You want the plastic to stay right in the stretchy zone, without it getting hot enough that it melts through or tears. You need that closed volume of heated air above the table to keep the temperature uniform. If you try to just blow on the top of the plastic with the heat gun, you'll get hot spots and cold spots; blisters and tears.

          Comment


          • #65
            OK, got it. This would require a little re-jiggering of my oven setup to include some sort of holder for the heat gun to suspend it over the oven pointing down. The nice thing about pointing it up is that it's actually built with a variety of flat propping surfaces to sit upright or flat on its side.

            I'll give this a try soon. Thanks!

            Comment


            • #66
              Sounds about right. I've never bothered with an oven I've always used just the heat gun on the frame and if it becomes required use the heat gun to warm places which need a bit more extra pull. Be careful though as applying heat whilst the pull is in motion can blow hole in the plastic. I'm lucky in that my failure rate is virtually nil but it's just a case of getting use to it all and tons of petience.

              Comment


              • #67
                Make a hole in the side of the oven, and set the heat gun horizontally, blowing into the hole. You shouldn't blow downwards with a heat gun, not for long. It will overheat its innards and trip the thermal switch.

                Comment


                • #68
                  Ok, I can see that this is going to require a little rethinking of my setup. Again, the whole "oven" thing is no big loss if I toss it, so I'm not going to hold myself back for the sake of figuring out a way to use/repurpose it.

                  On my last, and most successful (well, relatively speaking!), attempt, I applied a lot of heat as it was sucking down. I didn't hold back, and just nuked it, to see how much it could handle. I was surprised that the plastic didn't tear or noticeably thin at the bottom of the mold. The bubble that formed was on top of the mold, where some hot air got trapped when the sides sucked all the way down, and inflated and stretched the plastic. When I tried to blast the bubble with more heat to iron it out, that's when it got too hot and blistered. Lotsa learning on that try!

                  Comment


                  • #69
                    Re-jiggered the rig, and fired it up today. I'll post some pics tomorrow, but I basically set it up as Bruce suggested: it worked really well! More explanation with the pics...

                    Comment


                    • #70
                      Ok, so here is more photo documentation of my progress.

                      This is the new oven-on-the-table setup. I shortened the legs of the chimney to just fit over the table, and made a 2 inch hole in the side of the box for hot air injection.
                      Click image for larger version

Name:	new setup.JPG
Views:	1
Size:	483.4 KB
ID:	836222

                      I warmed the table first, as per Bruce's suggestion, then inserted the plastic frame. With the heat coming from above and below, I could see the frame begin to droop and drop down to the table level fairly quickly. The whole process took less time than my previous attempts. This, the 6th take, turned out pretty well!
                      Click image for larger version

Name:	take 6.JPG
Views:	1
Size:	475.8 KB
ID:	836223

                      And here is a rough product example. (I'm going to keep this one, as it might work out for a J-bass size pickup!)
                      Click image for larger version

Name:	fair result.JPG
Views:	1
Size:	317.3 KB
ID:	836224

                      You can probably see from the sheen of the plastic that one side looks glossier/wetter than the other. It was obvious as the plastic was heating and beginning to drape over the mold that this side was getting more air flow than the other side. Actually, after I turned on the vacuum, I pulled off the oven and spent a little more time on that other side with the heat gun to get the edges to pull down. The finished product bears evidence of this unevenness, as the glossy side is about half the thickness of the other, and actually thinned to the point of cracking in one corner.

                      Still, this is a step forward. I'm going to try again today.

                      [If it seems like this is a lot of work for something that can gotten from Mojo for much less trouble and cost over the long run, that's beside the point for me. This is my hobby, and messing around with stuff like this is damn fun. So far, I estimate that I've gone through about $5.58 worth of plastic, the heat gun was about $35.00, and maybe $10.00-$15.00 in other bits and pieces. Totally worth it, in my book.]

                      Comment


                      • #71
                        I've had best results placing my heated plastic over my Buck,Then starting the vacuum .
                        "UP here in the Canada we shoot things we don't understand"

                        Comment


                        • #72
                          I wonder if a heat lamp or halogen lamp would work for heating instead of a heat gun. No chance of blowing a hole in the sheet with a lamp.
                          I've also seen boxes with the deck made with sanding screen rather than peg board.
                          The hole size, count and placement is pretty critical for best results.

                          Comment


                          • #73
                            As of yesterday, I'm on my third "oven" configuration: trying (against advice) to shoot the air straight down. The first try was a little too intense and did melt the plastic. I have one more idea, and then I may try a heat lamp. It can still work in the oven box.

                            Sanding screen, as in over the perforated platen? I will try that, and maybe put a few more holes in the table, as well.

                            Comment


                            • #74
                              Originally posted by Jason Rodgers View Post
                              Sanding screen, as in over the perforated platen?
                              I was actually thinking using sanding screen in place of the perforated platen as shown here.
                              I dont care much for his choice of gasket material, I believe O-rings in a routed channel would be more efficient, permanent and cleaner.

                              Comment


                              • #75
                                Hey, that video is very helpful. Thank you!

                                Comment

                                Working...
                                X