Ad Widget

Collapse

Announcement

Collapse
No announcement yet.

Using a multimeter as a gaussmeter

Collapse
X
 
  • Filter
  • Time
  • Show
Clear All
new posts

  • #31
    Originally posted by DrStrangelove View Post
    Remember where you are. As often as not, we're standing on each other's feet.

    Snark dispensed, congrats on some outstanding first principle thinking.

    Reminds me of content in John Strong's 1938 reference called Principles in Experimental Physics, ISBN-13: 978-0917914560. Available used for under $10, I note. I still reread sections when parts seem too expensive.
    THAT is the kind of book and practical experiments I mean

    When I was in High School I asked for the key to the almost unused Physics Lab, also the Chemistry one, chock full opf oooolllldddd brass, glass and polished wood scientific Lab instruments, which I was allowed to play with, nobody cared or controlled me.

    I made real hairy experiments on both and it opened my eyes immensely.

    In a way, and related to what we were talking about just a couple days ago, equivalent to actually milking a cow and then making homemade yoghurt or killing/cleaning/cooking a chicken vs. buying plastic pots or a ready-for-microwave breast at local Supermarket.

    PS: just found the book, thanks, currently downloading it.

    It starts with glass blowing into lots of useful shapes ...... dreams of homemade tubes spring to mind
    Juan Manuel Fahey

    Comment


    • #32
      Unfortunately the Hall coefficient of copper is very small, requiring high transverse current density (around 1A/µm copper) to produce a Hall voltage of a few 100µV at 1 Tesla.

      Here is a nice experiment using an 18µm copper clad Hall probe which should give some idea:

      https://repository.curriculab.net/fi.../p2530300e.pdf
      Last edited by Helmholtz; 08-06-2019, 04:08 PM.
      - Own Opinions Only -

      Comment


      • #33
        Thanks.

        I love not only the experiment itself, which is about what I was about to do, after all the Hall Effect is a quite simple effect; but mainly because it explains how to calibrate it, based on first principles.

        That said, It looks somewhat difficult but "doable"

        That graph shows a few microvolt DC output, but I am on the safe side of it:
        they expect almost 8uV with a 2000 Gauss field (0.2 Tesla), I will work with >10000 Gauss (1T) so apply a 5X correction factor in my favour.
        They also use .018 mm (18 micron) copper, I can use 0.2mm (twice the printing paper thickness) and even 0.4 mm so I have an additional 10X to 20X factor my way.

        So my basic probe half scale sensitivity (supposing 20000 Gauss is full scale so I can easily read between typical 8500 Gauss (junk chinese speaker) and ,say, 12000 (good Celestion one) , 15000 (good JBL) or 20000 (top of the line JBL driver) will produce, with 10000 Gauss (average "own brand" Guitar speaker, say a cheap Eminence) will be about:
        8uV * 5X * 11X=440uV or almost half a millivolt.

        Not easy but doable, specially if Op Amp offset can be trimmed.

        My main problem now is how to attach tiny measuring wires to miniature copper strip,since in principle I don´t want to add thickness.

        The paper students had a huge gap between 2 coils, they could even use a copper penny as a Hall probe ; I can find as little as 0.8mm gap in tweeters and my probes should at most be half as thick ... including insulating sheets on both sides, measurement wires, etc.

        Oh well, if it were easy it would be boring

        Now I´m AMAZED as how coul Hall have measured it in 1860!!!!!!!!!!!!!!!!!!!!!!!!!!!!!
        Juan Manuel Fahey

        Comment


        • #34
          They also use .018 mm (18 micron) copper, I can use 0.2mm (twice the printing paper thickness) and even 0.4 mm so I have an additional 10X to 20X factor my way.
          No, it's the other way round:
          The Hall voltage is proportional to current per thickness, so if you use 0.2mm copper you will need 11.11 times the current (12A) resulting in 133A for the same sensitivity.
          Sensitivity increases with lower copper thickness (more exactly: higher current density) but so will temperature.
          Last edited by Helmholtz; 08-07-2019, 04:38 PM.
          - Own Opinions Only -

          Comment


          • #35
            Originally posted by J M Fahey View Post
            I need to measure loudspeakers, typical values between 10k and 15k Gauss (way above saturation point for any Hall sensor I found) and inside down to 0.8mm gaps in loudspeakers, where to boot path is curved and voice coils can be as small as 12mm diameter.

            So the main problem is the sensor, both in sensitivity and size.
            It strikes me that one can use a voice coil as the test coil, and you know how many turns you wound.

            Manually place the coil in the center of the polepieces. Zero connected integrator. Manually remove coil from loudspeaker, moving the coil at a steady pace that is fast enough that the integrator has a reasonable signal to work on, and not so fast that the opamp in the integrator saturates. Or use a ballistic galvanometer.

            If it is unobvious where the peak field is, move coil from infinity to as far into the magnet assembly as possible, or the other way, and look for the sign reversal in the output voltage.

            Comment


            • #36
              It strikes me that one can use a voice coil as the test coil, and you know how many turns you wound.
              Yes, see posts # 11,17, 26.
              - Own Opinions Only -

              Comment


              • #37
                Originally posted by Helmholtz View Post
                Yes, see posts # 11,17, 26.
                You are right. So, I don't understand why the continuing angst about how best to measure the field in the gap.

                Comment


                • #38
                  You are right. So, I don't understand why the continuing angst about how best to measure the field in the gap.
                  Because results are completely different.
                  Sweeping a coil through the gap gives you the TOTAL flux, which you divide by gap surface to calculate AVERAGE flux density .

                  With the added uncertainty that sweep also passes through fringe areas and wasted flux (which may be as much as 50% of total) so:

                  a) in principle, value will be artificially higher than real.
                  Not good in a *measurement* instrument.

                  b) it´s an end to end average, you have no clue about flux at a given point.

                  c) while a small (say 1mm by 1 mm) Hall sensor will give you accurate results, measured "there and nowhere else" so you can, among other things, optimize voice coil length for maximum efficiency by mapping gap flux.

                  An approximation to that can be done using a single turn coil (for precision) mounted on a rig which allows *exact* 1 mm sweeps (easier said than done) so you again integrate and divide but in 1mm steps.

                  Reasonable on a Lab environment where you are writing a Paper or something, slow clumsy for everyday testing of production speakers, even if you take 1 in 100 aside for Quality Control.

                  What I do is "waste" time once doing the detailed mapping and once determined the strong/useful area scan just that in future tests sliding coil along a turned nylon cylinder with adjustable "stops".
                  But inserting a thin probe and watching a display certainly looks easier
                  Juan Manuel Fahey

                  Comment


                  • #39
                    Out of curiosity: Are airgap flux densities in excess of 1 to 1.5 Tesla efficiently achievable using low carbon steel (1006 to 1010) pole piece material or would this require something like "pure" ARMCO iron?
                    - Own Opinions Only -

                    Comment


                    • #40
                      No need for special steels, low carbon rules.

                      SAE1008 is standard, sometimes 1018 is used because that´s all that´s stocked at sellers.

                      For polepieces 12L14 cold rolled round bar stock is popular because it contains minuscule lead droplets which help break swarf into small scales or pieces while soft malleable low carbon steel can produce looong (up to 5 meter) sharp edged coils which to boot clog machines or at least get in the way, big time.

                      The slight magnetic properties loss is acceptable.

                      Big problem is not permeability or saturation, but "impure" iron keeps *some* residual magnetism which is opposite polarity from main magnet and so is a guaranteed flux killer.

                      Remember tools magnetize easily and Alnico is just tool quality Steel alloy which *happens* to keep residual magnetism more than others.

                      Remember it´s VERY VERY hard and can only be worked with diamong grinding wheels

                      back to question: yes, up to 15kG (1.5 Tesla) is achievable without much trouble, and up to 20kG being very careful, of course admitting some losses.

                      Only acceptable in HF drivers; a 20kG woofer would be prohibitive.
                      Juan Manuel Fahey

                      Comment


                      • #41
                        Thanks.
                        I just figured it would require more than doubling magnet weight to double airgap flux density using low carbon steel, as pole parts would be in "partial saturation" at least above 1 Tesla.
                        - Own Opinions Only -

                        Comment


                        • #42
                          Yes, you are going uphill and slope becomes steeper all the time.

                          In this case "saturation" behaves different.

                          Saturated iron does not "stop" magnetic flux, it simply has less and less permeability, it slowly stops being the "preferred path" compared to air or vacuum, it stops "focusing", waste increases, and flux is less focused where you need it and spreads outside.

                          So to increase it a little you just increase magnet mass a lot.
                          Juan Manuel Fahey

                          Comment


                          • #43
                            Yeah, that's what I expected.

                            The behaviour you describe is typical for beginning saturation. Flux cannot be stopped anyway as there is no magnetic insulator. It can be locally shielded or compensated but that doesn't mean stopping the flux of the magnet. Every flux line that leaves the north pole must re-enter at the south pole as flux lines are closed loops.

                            Surprized that you seem to use alnico (remembering that you built a strong magnetizer for ceramic magnets). I figure that with alnico it is necessary to magnetize with the magnet mounted in its final assembly to avoid partial self-demagnetization of the free magnet.
                            Last edited by Helmholtz; 08-19-2019, 03:18 PM.
                            - Own Opinions Only -

                            Comment


                            • #44
                              Oh, sorry, I only use Ceramics.

                              I mentioned Alnico as an example , people think of it as "a magnet, period" while it´s actually more than that, a VERY HARD steel.

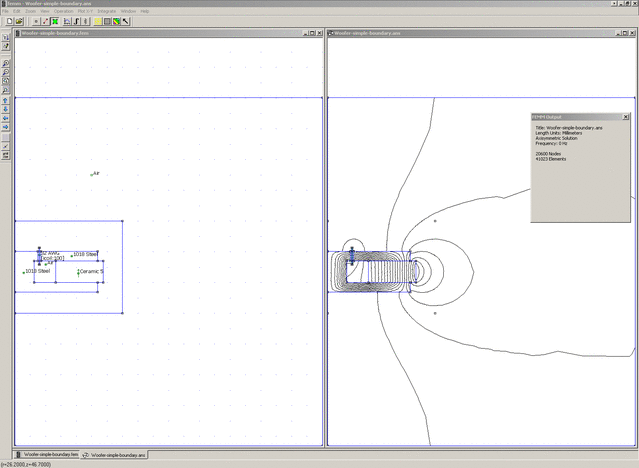
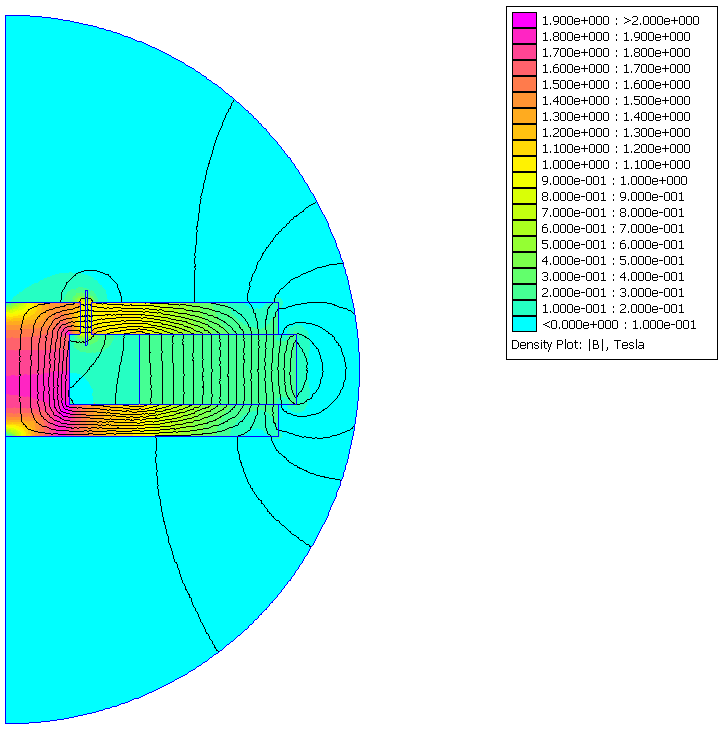
                              I´m adding a FEMA graph of magnetic flux intensity in a speaker magnet assembly; this one reaches very high levels ... but compare the huge magnet size to the tiny VC gap.

                              It also shows magnetic lines going outside, what people experiences when sticking a screwdriver to a speaker back and which is actually 100% waste, and saturation *inside* the system.

                              Surprisingly the bottleneck is not the gap itself but inside the pole piece


                              Juan Manuel Fahey

                              Comment


                              • #45
                                Surprisingly the bottleneck is not the gap itself but inside the pole piece
                                Flux (lines') density must be highest where flux carrying cross section is lowest. But as it is a 3-dimensional problem, a 2-dimensional illustration may be misleading.
                                - Own Opinions Only -

                                Comment

                                Working...
                                X