New Month We are at $10 this month in Donations.Please consider making a donation. :)
Wishing everyone a Happy New Year and many repairs in the coming Months. Just remember it is YOU who helps this site be what it is. You are the reason people come here for no BS answers.
Happy NEW YEARS!!!!!!
Something else I've done: If the board is mounted solder side up and there's say an open resistor or something on the bottom/component side. I've unsoldered the resistor, shaken it out of the chassis, and just soldered the new one on the solder side rather than remove the entire board.
This is a legit method that is sometimes recommended/approved by various manufacturers, so no shame there. Imagine thousands of warranty claims that can have an hour less labour costs for something like changing a commonly blown screen or plate resistor.
In Chuck's case I wouldn't be surprised if they ok'd it if done correctly like he mentioned.
Related topic: Do you know when to throw up your hands and declare the patient deceased?
I counted twenty or more lifted traces on this Champ 12:
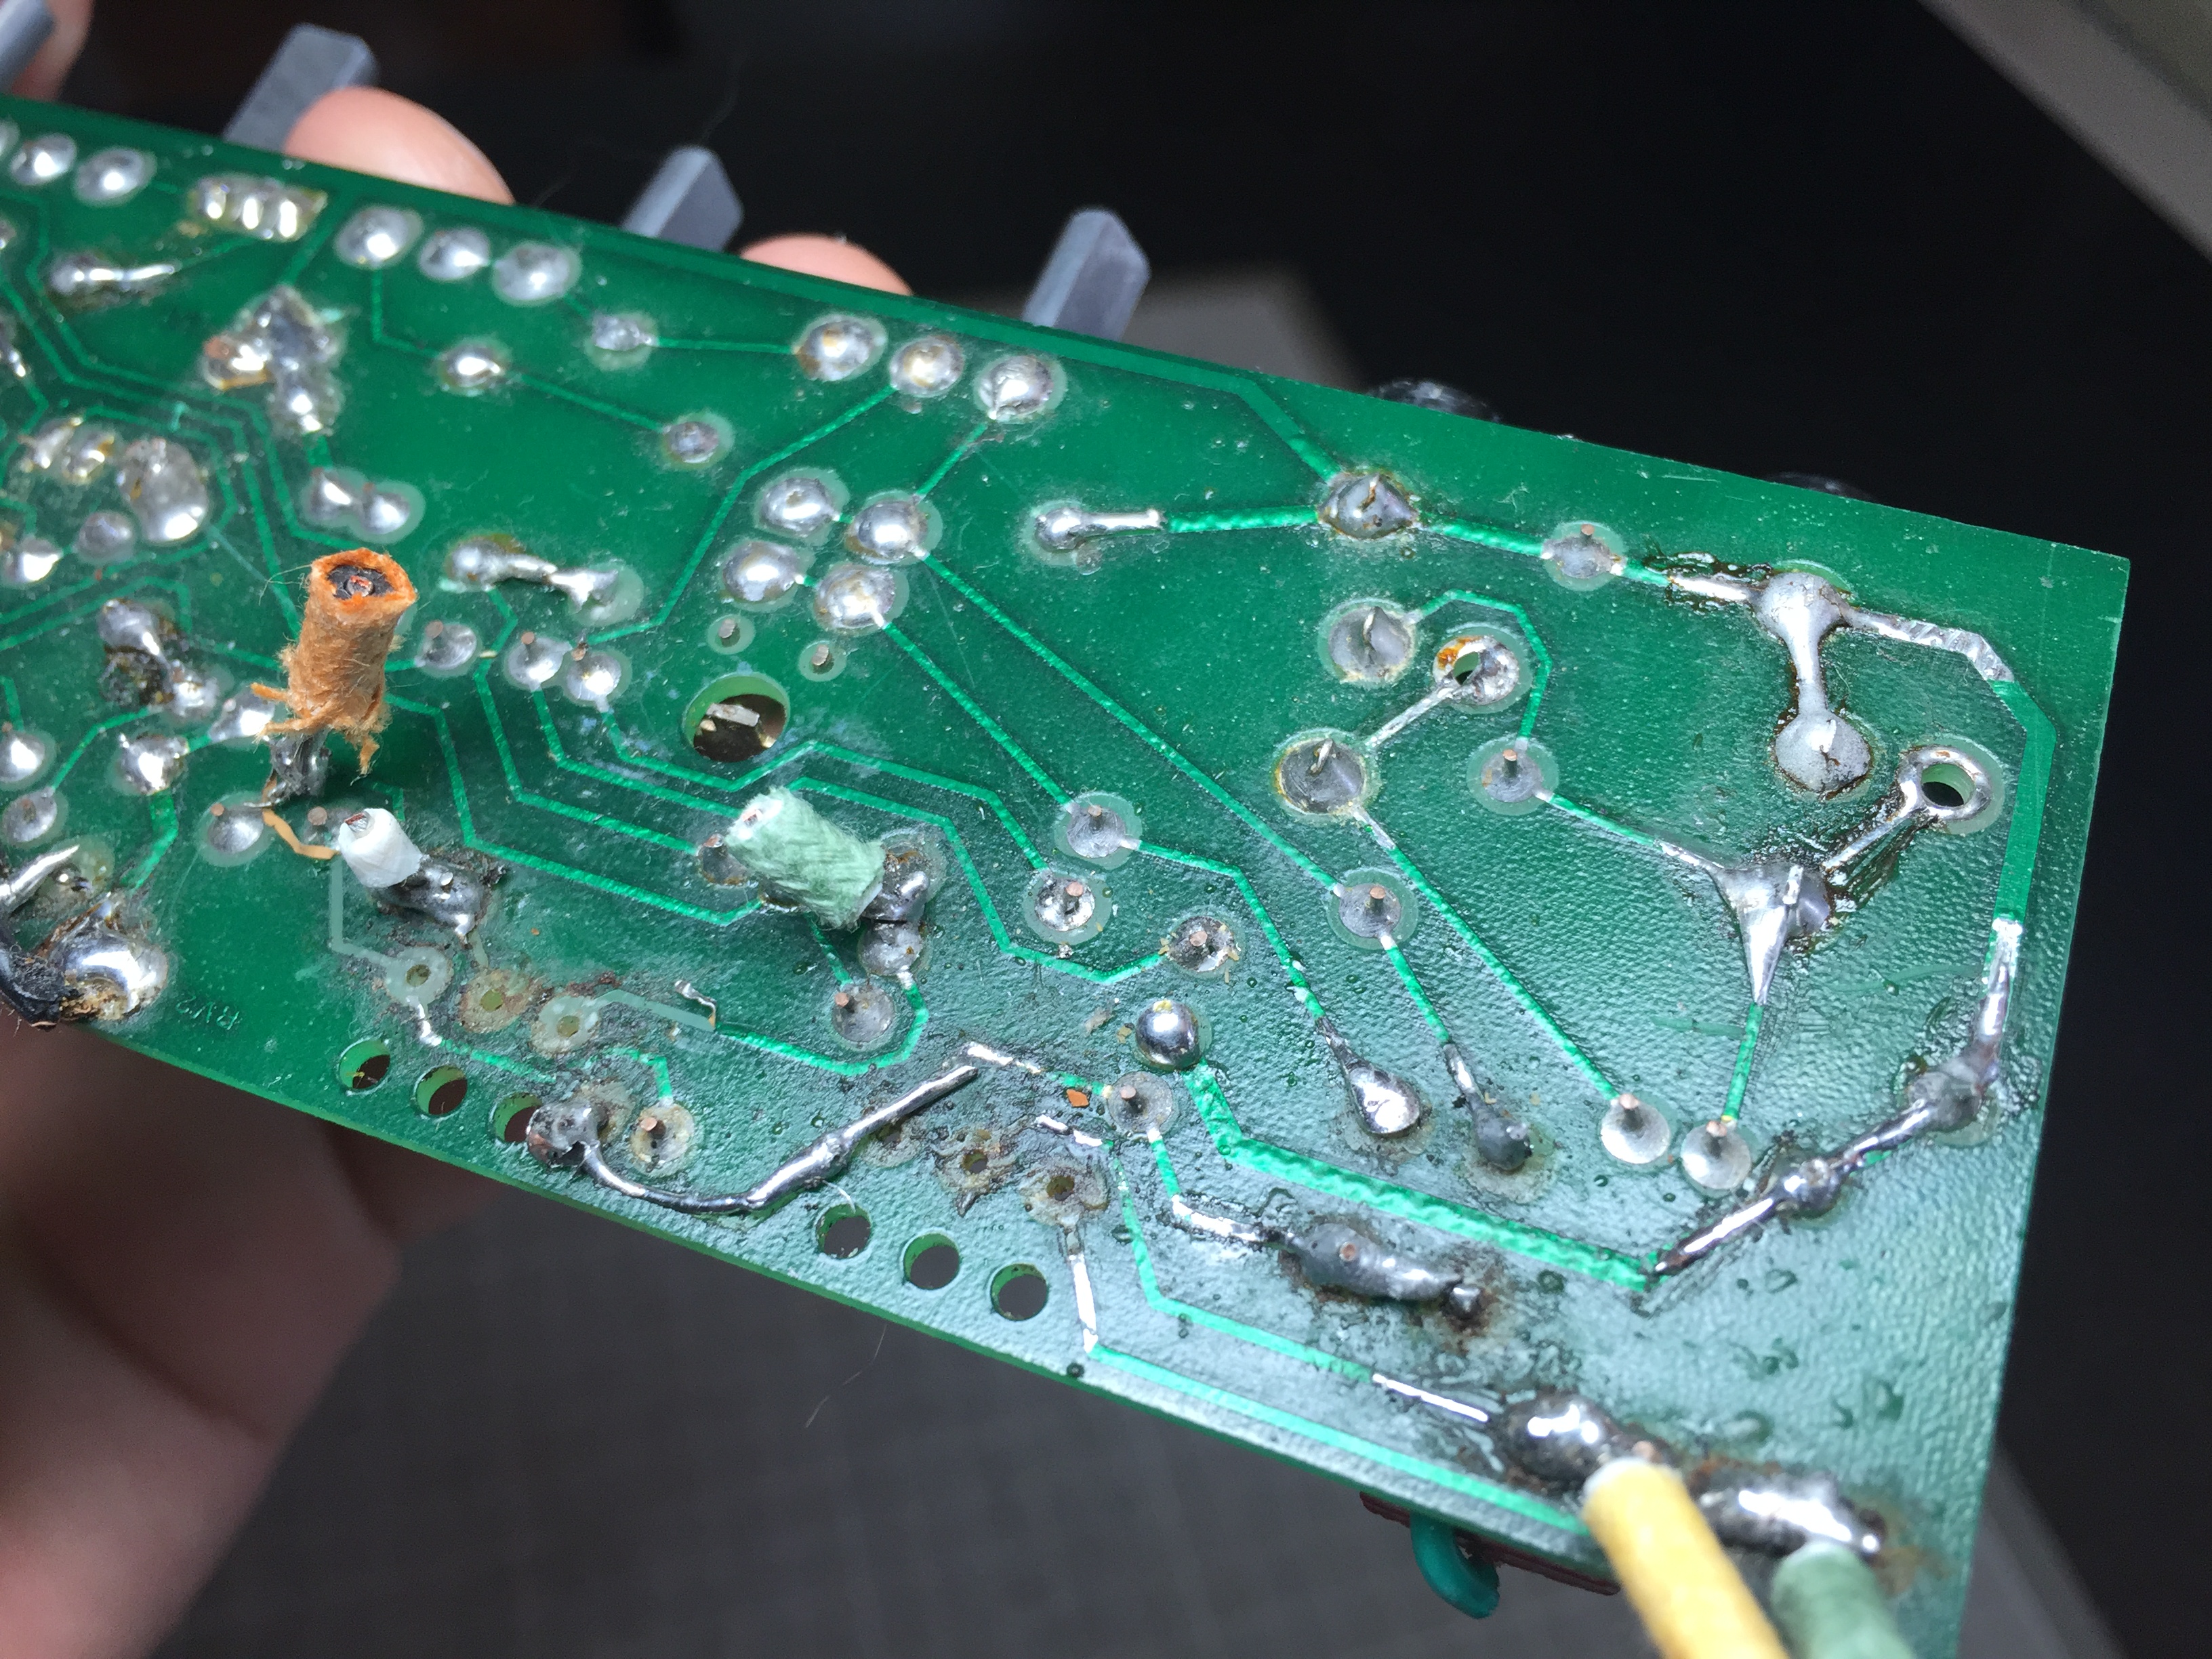
Sometimes you have no choice, I've had to repair cracked boards with many broken traces. But if you can get a board for a reasonable cost, it can save enough labour to pay for itself, and improve reliability.
Originally posted by Enzo
I have a sign in my shop that says, "Never think up reasons not to check something."
Sometimes you have no choice, I've had to repair cracked boards with many broken traces. But if you can get a board for a reasonable cost, it can save enough labour to pay for itself, and improve reliability.
I agree! Throw that thing at a car, or something. I had to do an old Marshall JMP so clumsily modded it had nary a pad left! And many "floating" traces Just open holes with component leads bent over and soldered to the traces (of traces). This was an amp I purchased for myself and it was working fine at a well known S.F. bay area used Marshall specialist store. Oh well. They certainly knew how to replace lost knob caps, piping, indicator lamp lenses and rubber feet and how to use Armor All
"Take two placebos, works twice as well." Enzo
"Now get off my lawn with your silicooties and boom-chucka speakers and computers masquerading as amplifiers" Justin Thomas
"If you're not interested in opinions and the experience of others, why even start a thread?
You can't just expect consent." Helmholtz
I agree! Throw that thing at a car, or something. I had to do an old Marshall JMP so clumsily modded it had nary a pad left! And many "floating" traces Just open holes with component leads bent over and soldered to the traces (of traces). This was an amp I purchased for myself and it was working fine at a well known S.F. bay area used Marshall specialist store. Oh well. They certainly knew how to replace lost knob caps, piping, indicator lamp lenses and rubber feet and how to use Armor All
If the board is charcoal, it's possible it's toast. But with an expensive amp or repair there are always ways to affect a repair that aren't rediculously time consuming. (Grinding the bad spot out, epoxy in a piece of scrap board, use jumper wires.) If it's just pads that are gone, as long as you can make a reliable connection with similar architecture, so what? I have a fiberglass burnishing pen just for exposing clean copper on traces. It doesn't always have to be pretty. It does have to be reliable. Flux is your friend. Clean up the excess with alcohol.
They certainly knew how to replace lost knob caps, piping, indicator lamp lenses and rubber feet and how to use Armor All
I have a special fee for Armor All'd amps, when I accept them at all. And my ex-girlfriend who Armor All'd my car dash could never understand why that meant it was over.
Originally posted by Enzo
I have a sign in my shop that says, "Never think up reasons not to check something."
Not that it works in every case, and would depend on the complexity of the amp, but I "repaired" the rectifier switch circuit in my Prosonic by drilling the eyelets, then installing turrets and used wire to make the traces. So now it's a turret clone and layout of the original, with the new switch mounted. The PCB-mount lugs on the switch (all 12) fit perfectly into the turrets, with the wires on the other side.
Of course, I took lots of pictures beforehand, and also held the mini-board up to a bright light, to see if I missed anything. I got it right the first time... So the board is original, just "retraced."
I know this wouldn't work on a "chip amp" where things are so densely packed to be insane, but on an old Ampeg, Marshall, that Champ 12, it might be feasible...
Justin
"Wow it's red! That doesn't look like the standard Marshall red. It's more like hooker lipstick/clown nose/poodle pecker red." - Chuck H. -
"Of course that means playing **LOUD** , best but useless solution to modern sissy snowflake players." - J.M. Fahey -
"All I ever managed to do with that amp was... kill small rodents within a 50 yard radius of my practice building." - Tone Meister -
It's a shame to find Armor-Alled tolex when plane old soap & water & a scrub brush, when done correctly and with very little soap, does such a good job of cleaning up the tolex.
Getting back to the original topic, I've seen caps done like this on tagboards and feel that it is just a faster way to do things. Not better or worse really, just faster. If you don't have a big enough iron or a way to remove the solder from the eyelet, you just clip and splice. I see a lot of this done on terminal strip amps. Very few techs will unsolder a terminal strip connector to remove and replace a part.
Back in the '60s Sprauge used to supply small wire coils that were used to splice in new caps and resistors, I forget what they called them. You would clip out the old part and slip the small coil over the end of the old lead. Then slip the end of the new lead into the other end of the coil and solder the whole thing together. They didn't seem to last too long, most techs probably saw it as a waste of time. Just hook the end of the leads together and solder was faster and easier..
And remember that on some of the tagboards, the cap leads were used as jumpers to connect things under the board. If you try and remove one of these, you will have to remove the tagboard from the chassis to get to the underside and the other end of the lead wire.
...Back in the '60s Sprauge used to supply small wire coils that were used to splice in new caps and resistors, I forget what they called them. You would clip out the old part and slip the small coil over the end of the old lead. Then slip the end of the new lead into the other end of the coil and solder the whole thing together. They didn't seem to last too long, most techs probably saw it as a waste of time. Just hook the end of the leads together and solder was faster and easier...
This is just some nostalgic trivia. The attached photo shows one of those Sprague splices in use. Looks like it has been there since the 60's. They were were popular for P-to-P TV repair jobs. The wire coil was pre-coated with enough solder to fuse the joint when it was heated and it actually made a good strong repair if the part leads were overlapped under the splice coil. The coils were included in the Sprague 5 pack plastic boxes that the caps were sold in.
Getting back to the original topic, I've seen caps done like this on tagboards and feel that it is just a faster way to do things. Not better or worse really, just faster. If you don't have a big enough iron or a way to remove the solder from the eyelet, you just clip and splice. I see a lot of this done on terminal strip amps. Very few techs will unsolder a terminal strip connector to remove and replace a part.
Back in the '60s Sprauge used to supply small wire coils that were used to splice in new caps and resistors, I forget what they called them. You would clip out the old part and slip the small coil over the end of the old lead. Then slip the end of the new lead into the other end of the coil and solder the whole thing together. They didn't seem to last too long, most techs probably saw it as a waste of time. Just hook the end of the leads together and solder was faster and easier..
And remember that on some of the tagboards, the cap leads were used as jumpers to connect things under the board. If you try and remove one of these, you will have to remove the tagboard from the chassis to get to the underside and the other end of the lead wire.
Speaking as a non professional repair tech... There are always cases where it's better to splice than tear down and redo. The goal is to do more good than harm I suppose. So tearing four or six leads out of an eyelet or unwinding them from a turret can require some real heat and leads and components NEVER redress as nice as you want them to. Extra reheating of components, etc. I won't run down all the potential problems, but I will say that sometimes it just seems less "invasive" to splice. No, it doesn't look factory fresh anymore ON THE INSIDE. Good thing they put cabinets around most electronics Indeed, as long as the electrical connection is stable and reliable long term as any other method I just don't see any problem with some splicing when it's practical or sometimes clearly the less detrimental option.
"Take two placebos, works twice as well." Enzo
"Now get off my lawn with your silicooties and boom-chucka speakers and computers masquerading as amplifiers" Justin Thomas
"If you're not interested in opinions and the experience of others, why even start a thread?
You can't just expect consent." Helmholtz
Comment